
How to Choose a Tablet Stand That Fits Your Case and Stylus Routine

Affiliate Disclosure: We may earn a small commission on qualifying Amazon purchases at no extra cost to you. Full disclosure →
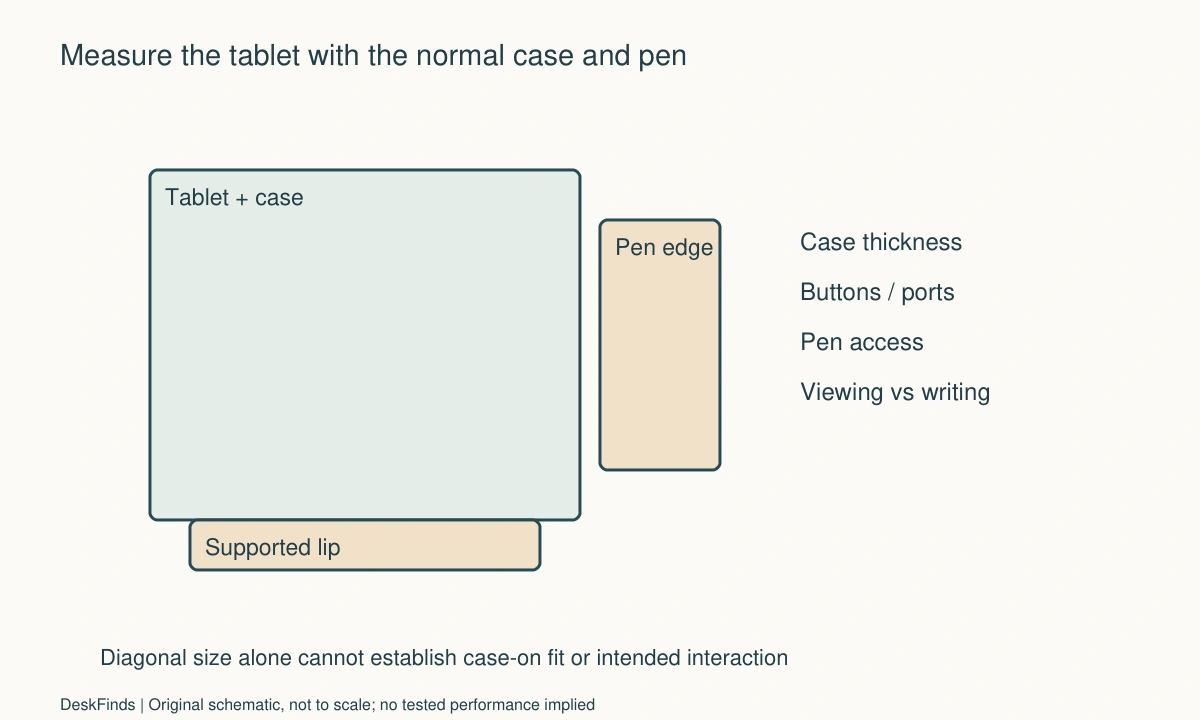
A stand can list your tablet’s screen size and still be inconvenient with the case you use every day. The lip may be too shallow, a button may sit against a support, or the stylus may have nowhere accessible to go. Choose around the complete tablet-and-case assembly and the way you interact with it, not the diagonal alone.
Quick answer: Measure the tablet with its normal case and check the stand’s documented compatibility, support depth, contact points, and permitted orientations. Separate viewing from handwriting or repeated touch use. Leave charging ports, controls, and stylus storage accessible. If the case must be removed every time, include that extra action in the decision rather than assuming the listed screen size confirms fit.
Define the main task
Decide whether the tablet is a reference screen, video-call device, typing screen, or handwriting surface. A high viewing angle may work for reading while an approved lower writing arrangement better suits another task. Do not treat one angle as universally appropriate or assume a stand intended for viewing is designed for sustained pen pressure.
List the accessories normally attached: case, keyboard cover, stylus, cable, or protective bumper. Include the weight and dimensions that the stand’s instructions require. If the tablet is used by two people with different cases, check both assemblies instead of measuring the bare device once.
For category context, see tablet stands and phone stands. An adjustable product is not automatically compatible with every device. Its adjustment range, support contact, and intended use still need to match the exact assembly.
Measure the case at the supported edge
Measure thickness where the stand will actually contact the device. A case can be thicker at its corners or hinge than across the middle. Include a folded cover only if the stand and case makers permit that arrangement. A cover compressed into a slot is not the same as a documented fit.
Compare the usable depth of the stand’s lip or cradle, not merely the overall size of its support. Check whether protective padding reduces the available space and whether the tablet rests on the intended surface. Avoid a fit in which only a case flap is supported while the device is free to slip or twist.
Satechi’s R1 compatibility information is an example of model-specific documentation worth seeking. It does not establish that every case works, or that another stand with a similar outline shares the same limits. Ask for confirmation when a thick protective case falls outside the information provided.
Inspect buttons, ports, and cameras
Check the device in each permitted orientation. A support lip can cover a connector, press a side button, or interfere with a speaker opening. The case may also shift where the device contacts the stand, so a successful bare-tablet fit does not answer the case-on question.
Use the intended charging plug in the outline. A bottom-facing port may need additional height, while a rigid side plug adds width. Leave room to grip the connector and route the cable without pulling the stand. Avoid selecting an adapter solely to rescue a physically cramped placement unless its compatibility is established.
If a cable connects to a dock or hub, the one-cable dock guide illustrates the broader distinction between connector shape and supported function. For the tablet itself, use its own documentation; laptop port assumptions should not be transferred without checking.

Give the stylus a defined place
Identify whether the pen stores magnetically on the tablet, fits in the case, charges on a particular edge, or uses another documented method. Check that the stand does not block that location. A pen that must be removed for every docking action needs a nearby appropriate storage place.
Do not attach magnets or improvised clips to the device to imitate another product’s pen storage. Use compatible accessories and follow the tablet and stylus instructions. Keep the pen out of the ordinary mouse sweep and away from a desk edge where a sleeve can push it to the floor.
If you switch between digital handwriting and a paper notebook, compare the small-desk handwriting layout for an adjacent writing-layout comparison. For this new batch, the related drawing-tablet layout guide explains the separate space needed by a pen-based input task.
Compare viewing and writing states
For viewing, check readable placement and the space used by the deployed base. For writing, confirm the support is intended for the interaction and does not obstruct the hand or pen path. Test only ordinary supported use after delivery; do not push the tablet to estimate a tipping limit.
A keyboard cover can change the footprint substantially. Include its open position and the route needed to fold or remove it. If the tablet uses an external keyboard, reserve enough space for the keyboard and pointing device rather than assuming the stand’s small base is the whole workstation.
A separate pen tablet has different mapping and support considerations from a tablet computer. The drawing tablet versus display tablet guide helps distinguish those categories. Choose the input system first, then the furniture accessory that supports its actual use.
Check adjustment and removal
Read how the stand’s hinges or locks should be adjusted. Support the device as instructed and avoid altering resistance using an undocumented method. A stand that is easy to fold empty may require a different adjustment procedure when loaded.
Plan how to lift the tablet out without catching a case flap or cable. If the stand sits under a shelf, include the temporary height needed for removal. Leave a place to put the device while changing angles or attaching a cable. Do not rely on balancing it against the monitor during the transition.
If the tablet leaves the room daily, practice case-on removal, stylus retrieval, and cable disconnection as one routine. A stand requiring repeated case removal may still be acceptable for occasional use, but that cost should be explicit. Ease of setup is about the entire sequence, not just unfolding the base.

Worked example: a listed tablet size was not enough
Imagine a hypothetical parent using a tablet with a thick protective case for evening study. A compact stand lists the tablet’s diagonal in its supported size range. The buyer nearly orders it without checking the cradle because the product image shows a similar bare tablet.
The case-on measurement reveals a thicker lower edge and a pen holder extending from one side. The buyer compares that assembly with the stand’s documented lip depth and contact points. The tablet might fit without the case, but removing protection every evening would add several handling steps and leave the case loose on a crowded desk.
A second compatible stand is assessed in two states: upright reference reading and the manufacturer-approved interaction position. Its deployed base takes more room, so the buyer includes the keyboard and charging cable in the outline. The stylus remains accessible without being detached from its normal storage edge, if supported by that exact configuration.
The decision in this example favors the complete daily routine rather than the smallest folded stand. If neither product is confirmed for the cased tablet and intended pen use, the buyer continues searching rather than forcing a fit. This is a planning scenario, not a report of a particular stand’s stability or a claim that a specific case is universally compatible.
Do not overlook the surface beneath the stand
A level hard desk, a thick soft mat, and a movable lap surface are different support conditions. Use the stand only on surfaces and in situations supported by its instructions. A product suitable for a desktop should not be assumed appropriate for a bed or sofa because it is portable.
Keep the base fully supported and clear of loose papers. Include the actual mat if you intend to use one. If the stand rocks, slips, or cannot remain in its documented position during ordinary use, resolve the surface and compatibility question rather than adding improvised weight or wedging the hinge.
For a portable monitor instead of a tablet, see the stand and cable clearance guide. It covers a related footprint problem, but a monitor support should not be presumed appropriate for touch or stylus pressure.
A case-on acceptance checklist
Complete assembly
Record the tablet model, case, attached pen storage, and any keyboard cover. Measure at the actual supported edge, including thick corners or a hinge. If compatibility information refers only to the bare device, leave the case-on result unresolved. A screen-size range is useful for shortlisting, but it cannot describe every external case shape or attachment.
Contact and retention
Check that the device rests on the intended padded surfaces without pressing a button or relying on a loose case flap. Use only the documented orientation and support arrangement. If the lip is too shallow or the contact is uncertain, do not force the case into position. Obtain confirmation or compare another stand while return options remain available.
Pen and charging access
Place the stylus in its normal supported storage or charging location and insert the intended cable. Check removal without moving the stand or pulling the device. If the two accessories compete for the same edge, decide which routine matters more before buying. A stand that holds the tablet should also leave essential everyday actions possible.
Intended interaction
Separate viewing, light touch, and handwriting in your record. Confirm the stand is designed for the activity you need and check ordinary use without deliberately stressing the assembly. If writing requires an unsupported angle, use another documented arrangement. Do not convert a successful static fit into a general claim about pen-input stability.
Desk footprint
Outline the deployed base, keyboard cover, cable loop, and hand movement. Include a place to set the tablet while changing configuration. A small stand can produce a large working footprint when accessories open around it. Compare the complete state with the notebook or mouse that normally shares the desk instead of evaluating it on an empty surface.
Daily reset
Practice unplugging, retrieving the stylus, lifting the tablet, and folding the stand according to the instructions. Count case removal if required. If the routine becomes awkward, reconsider the accessory choice rather than accepting repeated unsupported balancing. A practical stand is one that fits the protected device and makes the transitions between tasks manageable.
Compare case removal as a real daily cost
Removing a case can be acceptable for a deliberate occasional task, but it should not be hidden in the compatibility claim. Count where the case is placed, how the tablet is handled, and whether the stylus or keyboard cover must also be removed. Include the reassembly step when the tablet leaves the desk.
If the case provides protection needed elsewhere in the day, repeated removal may be inconvenient even when the bare tablet fits perfectly. A larger compatible stand can be preferable if it supports the complete assembly and intended interaction. Conversely, paying for a larger stand may be unnecessary when the tablet is already used without a case at the desk.
Keep the decision tied to routine rather than appearance. A bare-device product photo can make a compact stand look simpler than the actual case-on workflow. Compare completed states with the accessories you own, and avoid buying a new case solely to rescue an uncertain stand fit unless the resulting combination is properly supported.
A second scenario: the stylus occupied the support edge
Imagine a hypothetical student whose tablet stores and charges its pen along one edge. The student uses the tablet upright for reference reading and at a supported interaction angle for notes. A stand’s lip and side support appear suitable for the device’s body, but the pen location is not considered in the first comparison.
The student marks the pen’s normal storage edge and checks it in each permitted orientation. In one arrangement, the stand would block access or require removing the pen before placing the tablet. The student does not move the pen to an improvised magnetic attachment or force it between the case and support. A separate suitable pen storage method is compared only if it follows the device’s instructions.
The next comparison includes the charging cable and keyboard cover. A support that leaves the pen accessible may still make the plug difficult to reach or use too much depth when the cover is open. The student outlines reading, note-taking, and packing states separately. Each state must have a clear supported place for the tablet, pen, and cover.
The final hypothetical arrangement may use one compatible stand for both tasks or different supported states with a simple transition. The student keeps the decision about pen charging separate from the tablet’s main power connection. No claim is made that an unnamed magnetic system or case works with every stand.
The lesson is that the pen is part of the assembly when it is stored on the device and part of the hand path when it is in use. Both roles belong in the fit check. A stand chosen from diagonal size alone cannot describe either requirement reliably.
Use the first week to refine the arrangement
After confirming documented compatibility, observe the ordinary routine. Notice whether the tablet is repeatedly lifted to reach a button, whether the cable crosses the writing hand, and whether the pen is placed in an unsafe temporary spot. Those observations can suggest a different permitted position without implying a product defect.
Change one layout variable at a time. Moving the stand, changing its supported angle, and removing the case together makes it difficult to identify which action improved access. Keep a simple note of the arrangement that works so the desk can be restored after cleaning or travel.
If the intended writing use is unsupported or remains unstable in its documented arrangement, do not compensate with arbitrary weights, clamps, or hinge modifications. Seek a suitable product or another supported way to use the tablet. A stand is an accessory to the task; the task should not require defeating its instructions.
When sharing the stand, check each user’s device and case separately. Similar screen sizes can hide different button positions and thicknesses. Agree on a clear reset state that leaves the support ready for the next user without leaving a tablet balanced temporarily against unrelated equipment.
Sources and scope
- Satechi R1 compatibility guidance - Example of model-specific stand compatibility information, not confirmation for every case or writing task.
Editorial note: This is a research-based planning guide, not a hands-on product review. All worked scenarios are hypothetical. Measurements and compatibility must be confirmed for the exact equipment. Photography supplies context, not proof of a tested arrangement.
Photos are illustrative and come from free-license libraries such as Unsplash; diagrams are original to DeskFinds.