
How to Choose a Portable Monitor Stand That Leaves Room for Cables
Affiliate Disclosure: We may earn a small commission on qualifying Amazon purchases at no extra cost to you. Full disclosure →
A portable monitor’s thin panel can suggest a tiny desk footprint. Its stand, folded cover, cable plugs, and adjustment space tell a different story. A useful stand supports the exact display in the intended orientation and leaves the cables relaxed, so an ordinary laptop movement does not drag the second screen out of position.
Quick answer: Verify the display’s supported stand or mounting interface, then measure the deployed support with cables attached. Check contact points, orientation, controls, viewing angle, and the route used to plug and unplug the monitor. Do not infer stability from a product’s collapsed size or use an improvised support because the screen is light. Include the packing routine if the setup is moved regularly.
Identify how the display is meant to be supported
Portable monitors may use a built-in kickstand, a folding cover, a compatible separate stand, or a documented mounting interface. Read the exact display’s instructions before choosing another support. A generic tablet stand is not automatically suitable for a larger or differently balanced monitor.
Record the outer dimensions, relevant weight, connector locations, and permitted orientation. If a stand lists compatible models, check the precise model rather than the diagonal size alone. If it relies on a clamp or magnetic attachment, verify the documented interface and contact requirements instead of assuming the panel housing can accept it.
The portable-monitor stand options guide provides category context. This article focuses on the deployed arrangement: what occupies the desk while the screen is working, and what happens when cables or nearby devices move.
Measure the deployed depth
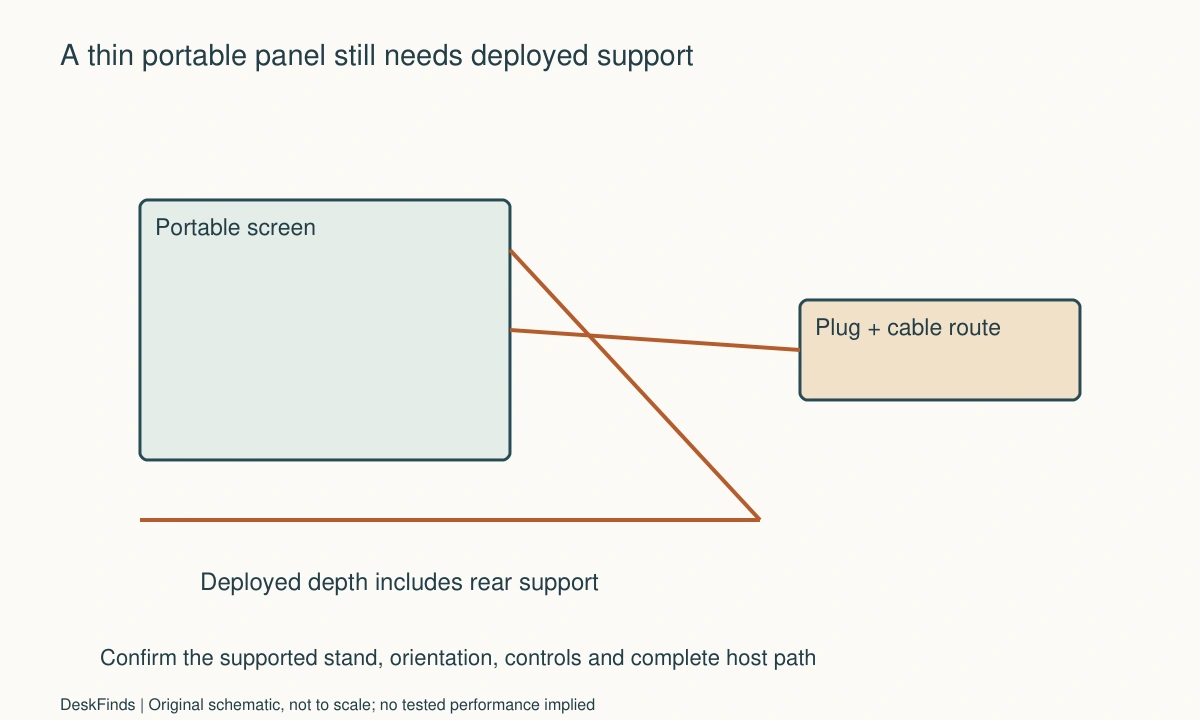
A folding cover or rear leg can extend well behind the panel. Outline that support on the actual desk and include the screen’s tilt. A stand that folds nearly flat for travel may still need substantial depth in use. Check the manufacturer’s drawings and permitted positions rather than balancing the display at an unsupported angle to save space.
Reserve a surface that supports the stand as intended. Avoid letting part of a base or kickstand sit beyond an edge or on an uneven stack of papers. If the desk has a raised lip or a soft mat, check compatibility rather than treating every flat-looking area as equivalent.
Compare the stand with the laptop in its ordinary open position. The laptop screen, hinge, and cables can occupy the same rear area as the monitor support. A layout that works only when the laptop is pushed into an awkward location may not be a real space saving.
Add the plug bodies to the outline
Portable displays often place video and power connections along a side edge. A rigid connector can add practical width, and a cable loop can enter the mouse area. Measure with the intended plug inserted, including the space needed to grasp it correctly.
Choose a route that does not pull the display when the laptop shifts. Support the devices independently and keep cables out of the path of a bag or sleeve. Do not rely on cable tension to keep a lightweight screen upright. If a longer cable is considered, verify the capabilities required by the exact monitor connection.
The portable-monitor power guide explains a separate compatibility question. A USB-C cable carrying power is not proof that it carries the required display signal, and a stand fitting the screen does not settle host compatibility.

Confirm the video and power path
ASUS’s portable-monitor guidance distinguishes USB-C video capabilities and model-specific connection methods. Use the selected monitor’s manual and the host’s port specification to identify the supported path. Some arrangements need separate power and video leads, so include both in the physical plan.
If a monitor uses HDMI for video and USB for power, do not count it as a one-cable setup because a product image shows only one visible lead. Conversely, a documented single USB-C connection can simplify the route when both host and monitor support the needed functions. The complete chain determines what is possible.
For a laptop with limited outputs, see two monitors from a one-HDMI laptop. Keep the number of supported displays and their modes separate from whether the portable panel fits beside the keyboard.
Check controls and ordinary interaction
Make sure stand contact does not block buttons, ports, vents, or a speaker opening that matters to you. Check how you adjust brightness or switch inputs while the screen is supported. A support that holds the panel but hides every control can be inconvenient during normal work.
If the display supports touch, verify that the proposed stand and orientation are intended for that use. Viewing stability and interaction stability are different questions. Do not deliberately push an unsupported panel to estimate a tipping threshold; use the manufacturer’s compatibility information and ordinary supported interaction.
For a tablet used as an alternative reference screen, the tablet stand with a case guide addresses a different set of contact and input requirements. A device used for handwriting should not be selected around viewing angle alone.
Compare landscape and portrait only when supported
Portrait can change the base contact, center of mass, cable direction, and required support height. Confirm that both monitor and stand permit it. A cover designed to hold the screen in landscape may not support a portrait arrangement even when the panel image rotates in software.
Check the final height beside the main screen and any shelf overhead. If the monitor is rotated while supported, follow the documented sequence and include the movement clearance. The portrait monitor clearance guide explains why the final outline alone can be misleading.
Avoid purchasing a stand for a possible portrait mode that the display does not support. If you mostly read reference documents, compare actual text readability in the permitted arrangements. A smaller secondary screen with suitable scaling may work better than a taller unsupported configuration.
Worked example: the cable used the remaining mouse space
Imagine a hypothetical student adding a portable display to a narrow desk. The panel width and laptop width appear to fit side by side, leaving a small strip for a mouse. The student initially compares stands only by folded size and screen-size compatibility.
A deployed outline changes the comparison. The chosen display’s side-facing plug and relaxed cable route occupy the same strip reserved for mouse movement. The rear support also needs depth behind the screen. The student does not solve this by pulling the cable tight or standing the panel on an improvised object.
Instead, the student compares a supported display location on the other side of the laptop, a different compatible stand with a documented footprint, and a revised input arrangement. The actual host port position is included, so moving the screen does not create a new cable across the typing area. The desk is evaluated with the notebook and other daily items present.
In this hypothetical case, one supported landscape arrangement preserves both cable access and mouse movement. Its folded package is slightly larger than another candidate, but its deployed geometry works better. The purchase criterion becomes the complete working state rather than the smallest item in a travel pouch. No stand’s stability or electrical performance is claimed to have been tested.
Plan how the screen is packed
Decide what stays at the desk and what travels. A built-in stand can reduce loose parts, while a separate compatible support may offer another useful angle at the cost of another item to pack. Include the required cables and protective case in the comparison.
Disconnect according to the equipment instructions before packing. Do not leave a rigid plug inserted where it can load the port inside a tight sleeve. Keep the case’s intended protective function separate from its use as a stand; a case that protects a panel in transit is not automatically approved as an operating support.
If the screen is put away every evening, practice that routine with the actual supplied accessories. Identify a dry, protected storage location that does not require stacking heavy items on the panel. A practical portable setup includes the transition between use and storage, not just the moment it is open on the desk.
Six checks for the complete arrangement
Supported interface
Record the display and stand models, attachment method, permitted orientations, and relevant limits. Check contact surfaces and any required accessory. A listing that says fits most tablets is insufficient evidence for an unrelated portable monitor. If model-specific compatibility is unclear, ask for confirmation before making the support part of a daily travel kit.
Deployed footprint
Measure rear legs, folding covers, base width, and screen tilt in the intended position. Include the laptop’s hinge area and other desk items. Do not evaluate only the collapsed stand or bare panel. If the support would hang beyond the desk edge, choose another documented arrangement instead of treating the unsupported portion as unused space.
Connector envelope
Use the actual plug bodies and a relaxed cable route to mark practical width and depth. Leave finger access and keep the route outside normal input movement. A connector that fits electrically can still create a physical conflict. Compare moving the screen or choosing a documented compatible cable before introducing a chain of adapters to force the layout.
Daily controls
Check brightness, input selection, and other essential controls with the display fully supported. If touch is a required function, confirm that the stand is intended for that interaction. A screen that can be viewed safely at one angle is not automatically suited to repeated tapping at another. Follow the product’s supported positions and avoid informal push-to-tip experiments.
Host and power
Write the complete connection path, including separate power where required. Verify the host port’s video function and the monitor’s input method. Keep this check distinct from stand fit. A successful physical layout does not add a display output to the laptop, and a capable host port does not make an unsupported stand appropriate.
Reset routine
Practice finishing work, disconnecting, folding the support, and placing the screen in its intended protection. Count the loose parts and choose a consistent location for them. If resetting the desk is cumbersome, simplify the supported arrangement. Portability is useful when the whole kit can be handled predictably, rather than when the panel alone is thin.

Compare the complete travel kit, not just the stand
List the monitor, support, protective case, required cables, and any power supply that travels. A very small separate stand can add loose parts, while a larger built-in support may simplify packing. Neither is automatically better; compare the kit you can deploy correctly at the places where you work.
At a fixed desk, folded size may matter little compared with deployed depth and cable access. On a shared table, the reset process can matter more. If the screen must be packed after every session, count disconnecting, folding, protecting the panel, and storing leads. A thin screen that requires an awkward reset is not necessarily the most portable working arrangement.
Do not use a protective pouch as an operating surface unless that use is supported. Keep storage protection separate from stand function. A case can protect the display in transit while providing no approved support or heat-management condition during use. The product’s intended states should guide the routine.
A second scenario: the screen changed sides between locations
Consider a hypothetical consultant who uses the same portable monitor at home and at a client desk. At home, the laptop’s suitable host port faces the screen naturally. At the client location, furniture and outlet positions make the same screen placement awkward, and the cable would cross the main typing area.
The consultant creates two supported layouts rather than forcing one photograph to describe both desks. Each includes the monitor’s deployed support, the actual host connection, and any separate power lead required. The screen is placed on the side that allows a relaxed route without consuming the mouse area, provided the monitor and stand support that orientation and placement.
The consultant checks control access after changing sides. A button or input port that was easy to reach can now face another object. The cable is not replaced merely to match a shorter aesthetic line; any replacement must satisfy the monitor’s documented data, video, and power requirements for the chosen connection.
A short private deployment note identifies the two arrangements and the correct leads. The consultant keeps the kit limited to the supported parts actually needed. If a location cannot provide a suitable surface or permitted connection, the monitor is not balanced on an improvised support to preserve a two-screen routine.
The hypothetical example shows why portability includes adaptation to real surfaces. It does not claim universal compatibility with client equipment or permission to connect to a managed computer. Host approval, electrical compatibility, and physical support remain separate questions at each location.
Ask about the loaded support state
When compatibility is unclear, send the display model, outer dimensions, weight, connector positions, and intended interaction to the stand maker. State whether you need landscape, portrait, touch, or viewing only. Ask about the supported contact and base position rather than relying on a general screen-size range.
Include the actual cable exit in a sketch if it is the main concern. A stand may hold the panel while blocking a side port or leaving a rigid plug close to the desktop. Ask whether a documented compatible alternative resolves the conflict. Do not infer that a tablet stand’s adjustable hinge authorizes every angle with a larger portable display.
After delivery, check the ordinary working arrangement while return options remain available. Keep the product in its supported state and avoid destructive or push-to-failure experiments. If a required control cannot be reached or the cable route remains under tension, revise the location or choose another supported product rather than adding improvised weights.
A successful comparison ends with a simple description: this display, this stand or built-in support, this host path, these cables, and this deployed footprint. That description is more useful to another user than saying the stand is compact, stable, or universal without specifying the arrangement behind the claim.
Sources and scope
- ASUS portable-monitor USB-C guidance - Distinguishes host video capability and model-specific connection methods; not stand compatibility evidence.
Editorial note: This is a research-based planning guide, not a hands-on product review. All worked scenarios are hypothetical. Measurements and compatibility must be confirmed for the exact equipment. Photography supplies context, not proof of a tested arrangement.
Photos are illustrative and come from free-license libraries such as Unsplash; diagrams are original to DeskFinds.