
How to Check Portrait Monitor Clearance Under a Shelf
Affiliate Disclosure: We may earn a small commission on qualifying Amazon purchases at no extra cost to you. Full disclosure →
Turning a monitor vertically can reduce its horizontal spread, but the top corner needs room during rotation. Under a shelf, a display may fit in its final portrait position yet collide while being turned. The useful measurement is therefore an envelope of movement, not just the height of the finished screen.
Quick answer: First confirm that the monitor and support allow portrait orientation. Compare the display’s outer dimensions, mount pivot, stand travel, and documented rotation sequence with the shelf, desk, nearby screens, and cables. Check the whole rotation route as well as the final height. If the supported movement does not clear, choose another approved arrangement rather than forcing the screen into the gap.
Confirm that the monitor may be rotated
Read the exact monitor’s manual. A rotatable image in the OS does not establish that the display hardware, vents, stand, or mounting arrangement permits portrait use. Different models in the same brand can have different restrictions. Do not copy another monitor’s rotation procedure solely because both are the same diagonal size.
Check the support as well. A factory stand may pivot, an arm may support rotation within stated limits, or the mount may not provide the movement you need. Verify the relevant weight and mounting compatibility before discussing shelf clearance. The VESA compatibility guide provides background for that separate check.
LG’s adjustment guidance and model-specific monitor manuals illustrate why the documented sequence matters. Some approved setups require lifting and tilting before rotation. Do not turn that example into a universal instruction for all displays; use the sequence specified for your own monitor and stand.
Measure the screen’s outer body
Use overall width and height, including the bezel, rather than the advertised diagonal or active image area. In portrait orientation, those outer dimensions exchange their practical horizontal and vertical roles. Include protruding controls or a camera if they are part of the moving assembly.
Record the distance from the mount’s rotation point to the screen edges when documentation makes that available. The rotation point is not always equivalent to an assumed geometric center in the actual assembly. Avoid applying a center-pivot calculation to an offset design without checking it.
Use a paper or cardboard outline only as a planning aid, never as a substitute for the mount’s instructions or a physical support for the display. Mark the actual outer shape and a documented pivot position if known. An outline can expose an obvious collision before you buy, but it cannot certify an installation.
Map the shelf and surrounding obstructions
Measure the underside of the shelf across the entire area the screen may occupy. Include brackets, trim, lighting, cable clips, and any unevenness. A low bracket at one end may matter more than the nominal shelf height. Measure from the actual desktop reference surface rather than from a convenient nearby floor point.
Add nearby monitors, speakers, lamp arms, and the wall. Rotation can move a corner sideways as well as upward and downward. A dual-screen arrangement may need more separation during adjustment than in its final position. Keep a hand-access route available for the supported movement and any locking control.
The recessed VESA plate guide addresses the mounting interface behind the screen. If that assembly requires an adapter, include its effect on the complete placement, but do not assume it changes the rotation route in a beneficial way without checking the actual geometry.

Distinguish final height from swept space
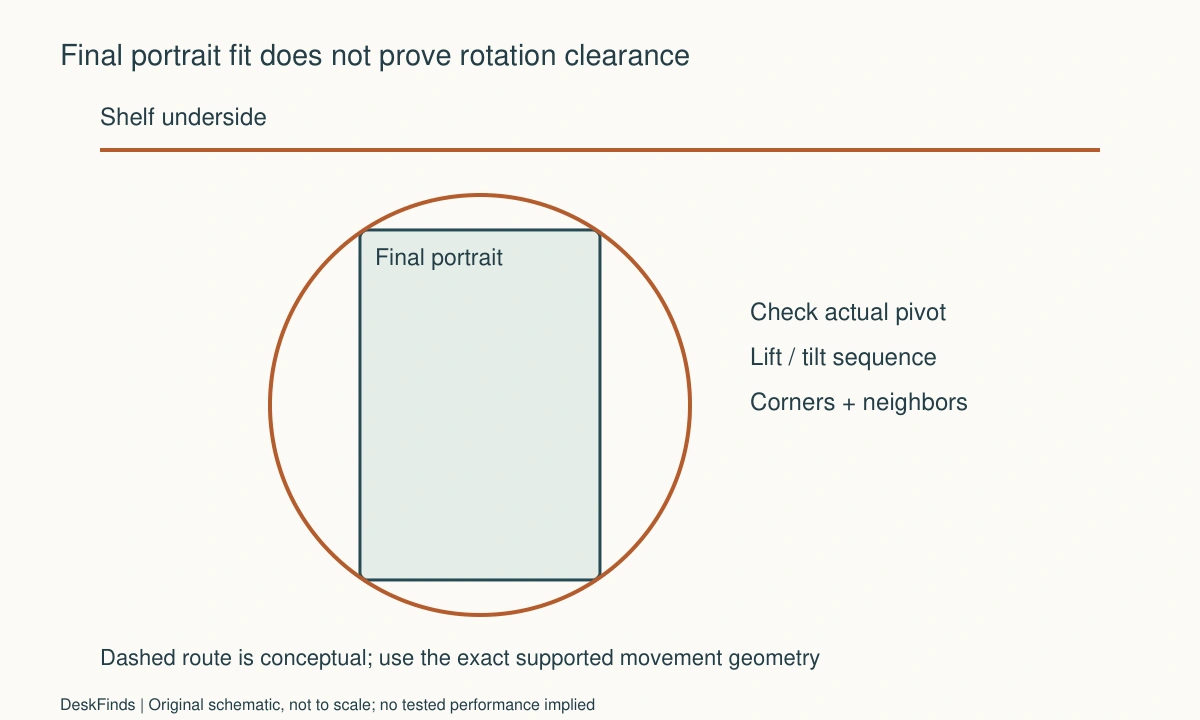
For an ideal rectangle rotating about its center in one plane, the farthest corner lies half the diagonal from that center. That geometric fact can help visualize why corners travel beyond the final edges. Real monitors, offset pivots, tilting stands, and arm movement require the actual documented geometry; the idealized calculation is not an installation rule.
Check the lowest corner against the desk and the highest corner against the shelf throughout the permitted sequence. If the manual requires raising the stand before rotating, include that temporary raised position. A display that fits when lowered in portrait may need more overhead space while being turned.
Do not solve a collision by twisting the screen through an undocumented route, loading the panel edge, or rotating an unsupported display. If a different installation sequence is proposed, have the manufacturer confirm it. When the normal approved movement cannot fit, changing the shelf location or display support may be the more straightforward answer.
Include cable and control movement
A video or power lead may tighten when the monitor turns. Check the ports and plug bodies in portrait orientation and during the allowed movement. Downward-facing ports can end up pointing sideways, and a previously convenient cable route may press against a bracket or neighboring device.
Follow the monitor and arm makers’ routing guidance. Do not use a very tight cable loop to preserve a clean rear view. Keep enough movement for the supported adjustment while avoiding loose leads in the chair or input area. If an adapter is necessary, verify its compatibility and added physical depth.
The two-monitor laptop guide covers the separate electrical question. A screen fitting physically in portrait does not establish that the host supports the desired number of independent displays or their modes.
Check readability in the intended position
Set the content orientation through the supported OS or graphics settings. Open the documents, code, or reference material you actually use. Portrait can reduce horizontal scrolling for some tasks while creating excessive vertical travel for others. Do not assume that a long page becomes easier simply because more of it is visible.
Adjust text scaling and position within the supported display setup. A screen tucked high under a shelf may be physically possible yet awkward for frequent reading. Keep the primary task in a comfortable ordinary viewing position and use the secondary display according to how often you consult it. This is a workflow check, not a medical prescription.
If a portable display is an alternative, compare the portable-monitor stand and cable guide. A smaller secondary screen may fit the task, but its deployed support and cable routes still need space.
Worked example: the final portrait height was misleading
Imagine a hypothetical user with a monitor beneath a fixed shelf. The measured final portrait height appears to fit with a small visible gap. The user nearly buys a pivoting support on that basis alone, then reads the monitor’s documented rotation sequence.
The required lift and tilt change the temporary space needed. A corner approaches the shelf before the display reaches portrait, even though the lowered final position would fit. The user does not test this by forcing the real monitor against the shelf. A dimensioned sketch and the product instructions reveal the conflict early enough to reconsider the layout.
The user compares three supported possibilities: moving the display outside the shelf area, choosing another appropriate display-and-support combination, or changing the shelf arrangement if permitted. Each option is evaluated against normal viewing, cable access, and the room’s use. A smaller gap at the final position is no longer treated as evidence that the movement will work.
In this example, the chosen option preserves an ordinary supported rotation route and leaves the nearby speaker clear. There is no claim that an unnamed arm passed a real test. The useful lesson is that temporary adjustment space belongs in a fit decision, even when the equipment spends most of its day stationary.
If you never intend to rotate it at the desk
A fixed portrait arrangement still requires manufacturer-approved installation and orientation. Do not assume assembling the monitor elsewhere eliminates all clearance concerns. You need a supported way to install, remove, service, and adjust it in the actual room, with appropriate assistance where the instructions require it.
Ask the manufacturer if the available documentation does not explain your proposed sequence. The shelf may prevent access to a retaining screw or release latch even when the screen’s front outline fits. Plan how the display would be removed for a cable change or service before committing to a cramped permanent position.
Keep the original stand and relevant parts if the instructions allow removal. Record which hardware belongs to which display. A future room change should not turn into a search for mixed screws or an improvised support because the original mounting components were discarded.
A six-part clearance record
Approved orientation
Record the monitor and support models and the documentation permitting portrait use. Check whether rotation direction or stand position is specified. A software rotation option is not enough. If the documentation is unclear, obtain model-specific confirmation and keep it with the purchase record, rather than treating a photo of another person’s setup as approval.
Outer dimensions
Write the display’s full body dimensions and any attached accessory outline. Use the overall unit rather than the panel diagonal. If you make an outline, mark its assumptions clearly. A rough sketch is valuable for rejecting an obvious conflict, but uncertain dimensions should not be rounded down to make a marginal arrangement appear possible.
Temporary movement
Trace the documented lift, tilt, and rotation sequence. Include the corners’ path and any change in the support’s position. Check both shelf and desktop collisions. If the display must be installed in portrait rather than rotated in place, verify that the manufacturer supports that sequence and that future removal remains possible in the real space.
Neighboring equipment
Include lamp arms, speaker cabinets, another monitor, shelf brackets, and the wall. Leave room for the person adjusting the screen to use the specified grip and controls. A clearance that exists only after disconnecting unrelated equipment may be acceptable for rare servicing, but it should be an explicit decision rather than a surprise during routine adjustment.
Cable slack and access
Observe the cable route through supported movement without pulling or sharply bending connectors. Check that power and video plugs remain accessible and do not bear the display’s weight. A cable that is relaxed in landscape can become taut in portrait, so both states belong in the record. Use only compatible adapters when a connection change is necessary.
Actual task
Open representative material and confirm readable scaling, usable window placement, and the intended role of the display. If the top of the screen is consulted constantly and feels awkward to reach visually, revise the layout rather than preserving portrait orientation for appearance. A technically fitting monitor should still serve the work that justified adding it.
Use an outline to reject a poor fit early
A full-size lightweight outline can help compare obvious geometry before purchasing a support. Mark the display’s outer body and any documented pivot position, then trace the permitted sequence on a drawing. Keep the assumptions visible. If the pivot or temporary tilt is unknown, the outline should show that uncertainty rather than suggesting a certified route.
Use the outline only as a planning object. Do not attach it to the monitor, insert anything into mounting holes, or use it to support equipment. Its value is eliminating an obviously crowded arrangement and identifying the dimensions still needed from the manufacturer. A promising sketch should lead to a documented compatibility check, not replace it.
Compare a permanent portrait location with a display that rotates regularly. The second needs an accessible ordinary adjustment route every time, while the first still needs a supported installation and service route. Neither can be evaluated solely from the final rectangle under the shelf. Write which routine applies before deciding how much temporary space matters.
A second scenario: the neighboring screen blocked the turn
Imagine a hypothetical user with two monitors beneath a long shelf. The secondary screen’s final portrait height clears the shelf, and its stand supports the intended orientation. The first drawing checks only vertical space and overlooks the main screen beside it.
The documented rotation route moves a corner sideways toward the main monitor. The user adds both displays’ outer bodies, their supports, and the necessary hand access to the plan. Separating the screens enough for routine rotation would change the normal viewing layout, so the user compares that cost with a fixed supported portrait arrangement and another location outside the shelf area.
The cable route is checked in each option. A lead tied tightly along the neighboring stand would restrict movement even if the panel corners cleared. The user follows the equipment instructions and does not try to squeeze the screen past the other display by twisting its housing or lifting it outside the support’s intended range.
The final hypothetical choice may keep the secondary display in a documented portrait arrangement with a suitable service route, or may abandon portrait under the shelf altogether. The key is that the nearby monitor is treated as an obstruction throughout the movement, not merely as an object that fits beside the final position.
This scenario does not claim that a particular dual-monitor arm permits independent rotation or that an installation was tested. It illustrates how horizontal neighbors can determine a decision initially described as an overhead-clearance problem. The supported path and complete room geometry decide the answer.
Consider the information you actually need on the tall screen
Portrait is often selected for long documents, code, or reference pages, but seeing more content is not the only task requirement. Check text size, the frequency of looking at the top and bottom, and whether the application places controls in useful locations. A screen that fits physically can still be poorly placed for its most frequent interaction.
Try the intended content in a supported available arrangement before buying additional mounting hardware where possible. If that is not possible, compare screenshots and dimensions as a planning aid without treating them as a hands-on test. Keep the acceptance criterion specific, such as reading a reference page without moving another device, rather than assuming portrait is inherently more productive.
A smaller display or a landscape screen with a different window arrangement may satisfy the task with less mounting complexity. Compare those supported alternatives honestly. The purpose of the measurement is to choose a workable reference display, not to preserve portrait orientation after the room has shown that it is a poor match.
When asking for manufacturer help, include the shelf clearance, adjacent objects, monitor model, support, and proposed sequence. Ask about the movement or installation point that remains uncertain. A reply about final height alone should not be interpreted as approval of a route that the question did not describe.
Sources and scope
- LG monitor adjustment guidance - Orientation and adjustment are model-dependent; use the exact monitor and support instructions.
Editorial note: This is a research-based planning guide, not a hands-on product review. All worked scenarios are hypothetical. Measurements and compatibility must be confirmed for the exact equipment. Photography supplies context, not proof of a tested arrangement.
Photos are illustrative and come from free-license libraries such as Unsplash; diagrams are original to DeskFinds.