
How to Measure a Folding Laptop Tray for a Seat or Bed Area

Affiliate Disclosure: We may earn a small commission on qualifying Amazon purchases at no extra cost to you. Full disclosure →
Folding laptop trays are often compared by the size of their tops. The legs and space beneath them can be the more important dimensions. A tray may hold the computer but place a foot on an unsuitable edge, conflict with a seat arm, or leave too little room for the user’s ordinary position. Check the full deployed structure and its permitted support conditions first.
Quick answer: Read the tray and laptop instructions, then measure the deployed feet, clear space between legs, underside height, top, and adjustment path. Confirm that the intended surface and loaded use are supported. Include a place to set the equipment during entry and exit. A tray fitting over a body or mattress does not automatically establish stability, laptop ventilation, or suitability for that location.
Distinguish a legged tray from a lap desk
A legged tray transfers its load through feet or supports onto another surface. A cushioned lap desk rests differently and has another set of fit questions. Do not compare their top sizes as if they describe identical support. Start by choosing the category that is documented for the intended situation.
The sofa lap desk guide covers the cushioned-support arrangement. For a legged tray, include the whole base and the user space beneath it. A folding design can be compact in storage while requiring a broad clear footprint in use.
Some products provide height and tilt adjustments, as illustrated by specific SONGMICS folding-tray designs. Those features are model-specific. Their existence does not mean every tray permits the same surface, load, angle, or adjustment while loaded. Use the exact product instructions rather than a generic category photo.
Check the laptop’s operating requirements
Read the computer’s own guidance before choosing a location. A stable, ventilated work surface remains important, and a tray does not authorize covering vents or using a prohibited operating state. Apple’s guidance distinguishes appropriate hard support from soft materials; consult the requirements applicable to your machine.
Identify which parts of the laptop need clear space and where its feet rest. A raised tray lip or textured panel can change those contact points. Do not assume an added fan or mesh panel makes any arrangement suitable. Electrical accessories and the tray itself have separate use conditions.
Keep power supplies out from under bedding, cushions, and other coverings unless their instructions explicitly provide otherwise. A product marketed for bed use does not override the laptop or charger’s restrictions. If the intended location cannot satisfy all relevant instructions, choose a different supported work area.
Measure the feet in the deployed position
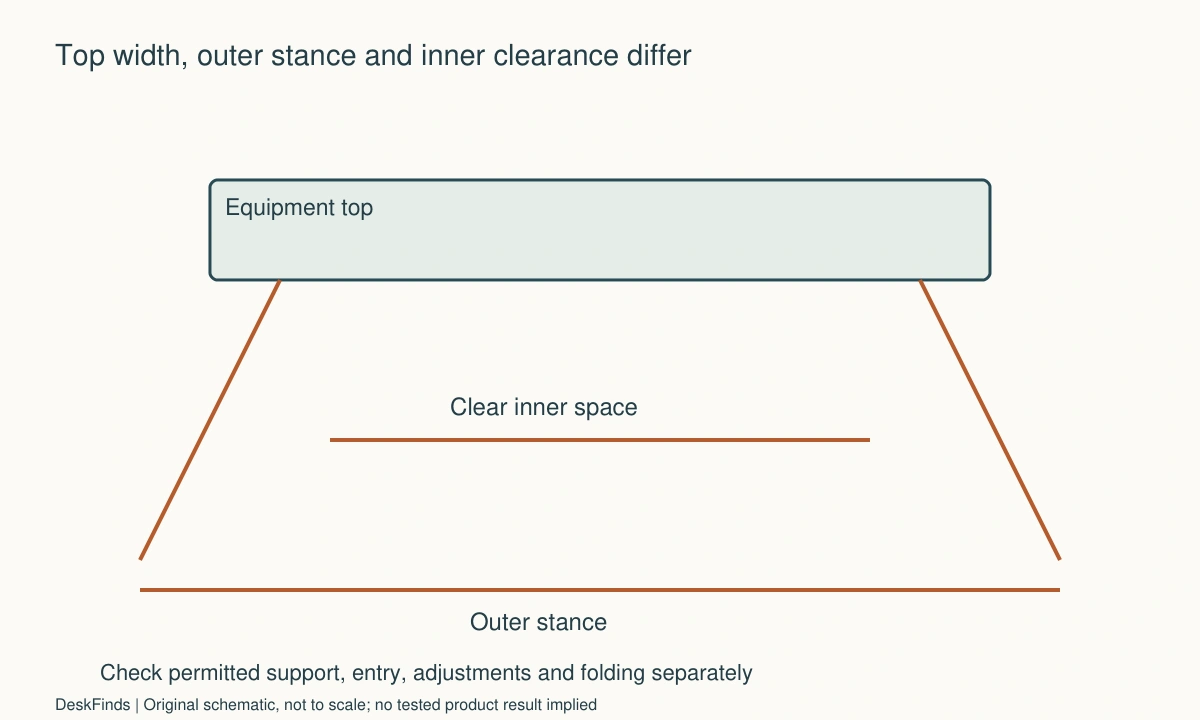
Use the actual outer footprint of the legs and feet at each permitted height or configuration you plan to use. A leg may angle outward beyond the top. Check for contact with seat edges, bed-frame features, or other obstructions. The full support must rest as instructed, not partly beyond a surface because the top fits.
Record the clear inner width separately from the outer footprint. Two trays with the same top width can leave different space beneath them. Include adjustment knobs, braces, and moving parts that reduce the clear region. A maximum outside dimension does not answer whether the user has adequate usable space.
Avoid adding blocks, wedges, or extensions to make an unsuitable foot placement work. If the support condition is not documented, ask the manufacturer about the exact surface. A soft or uneven area can behave differently from the hard tabletop used in a product demonstration.
Check underside height and entry
Measure the relevant clear height beneath the top and braces in the intended position. Include how the tray is placed and removed, not just the final pose. A user may fit while seated but have no practical way to enter or stand without lifting a loaded assembly.
Check the adjustment sequence. Some mechanisms should be changed unloaded or with support provided in a specified way. Follow those instructions instead of loosening knobs beneath a computer while trying to hold everything in balance. Keep fingers and cables out of folding and pinch areas.
If another person helps place the tray, make that part of the actual routine rather than assuming it will always be available. A product should be chosen for the handling method the user can follow consistently. Do not turn a single successful placement into a claim that every ordinary transition is manageable.
Add the top’s working state
Outline the laptop, plugs, mouse area, and any notebook on the usable top. Exclude cup recesses, slots, raised lips, and tilted sections that cannot serve the intended item. A top with several features may have less continuous clear surface than a simpler rectangle of the same outer size.
A tilting section changes the projected depth and the way the computer is retained. Use only supported angles and retention methods. Do not rely on a cable or an improvised stop to keep a laptop on an inclined panel. Check the computer’s own use conditions at that angle as well.
For a charging phone, see the landscape phone stand guide. A phone slot in the tray may not accommodate the actual case, orientation, and plug. Treat it as another compatibility question rather than free space already verified by the tray purchase.
Keep the surrounding route clear
Trace power and accessory cables from fixed points to the tray. Include the movement needed to set it down or move away. A lead can reach the working position yet become taut during removal. Avoid putting a cable across a route used by another person or beneath a folding leg.
Identify a stable permitted landing area for the tray or its equipment. If the tray is not designed to be carried while loaded, unload it through an appropriate sequence. A large top can be awkward to grasp when a laptop is open, so do not infer portability from the presence of folding legs.
The in-line document holder guide addresses paper reference on a conventional desk. If a large amount of paper work is required, that supported desk arrangement may be a better comparison than adding more items to a tray whose top is already occupied by a laptop.
Worked example: the legs were wider than the top
Imagine a hypothetical buyer checking a tray for a narrow seat area. The top width appears to fit between surrounding furniture, and the buyer nearly orders it from that dimension alone. The deployed drawing shows the feet extending farther outward than the top.
The buyer marks the complete footprint on the intended support surface and checks the product’s permitted conditions. One foot would approach an unsuitable edge in the original plan. The buyer does not shorten the stance, partially fold a leg, or add a block to force the tray into the gap.
A different documented configuration or another suitable product is compared. The clear inner width and underside height are recorded as separate measurements, because a smaller outer footprint could also reduce user space. The laptop’s operating support and cable route remain part of the comparison.
In this hypothetical case, the right answer may be another location rather than another tray. The example shows how a top-only measurement can conceal the actual support footprint. It does not certify a product for a particular mattress, seat, or user and does not claim a load test was performed.

A second scenario: adjustment was easy only when empty
Consider a hypothetical student who wants to alternate between reading and typing angles. The empty tray folds and adjusts easily, so the student assumes the same knobs can be loosened while the laptop and other items remain on top. The product instructions specify a different supported adjustment sequence.
The student includes that sequence in the routine. The laptop and loose items receive appropriate temporary locations before an adjustment where required. Cable slack is checked, and the student’s hands remain clear of the mechanism. If the transition is too cumbersome for frequent task changes, another supported arrangement is compared.
The student also evaluates a fixed-angle session: prepare the tray before work, use it for the defined task, and reset afterward. That can be more practical than expecting continuous adjustment. A product’s range of positions does not imply that every position change is convenient or permitted under load.
The final hypothetical choice follows the real task frequency and handling instructions. It may favor a simpler tray or a conventional desk. The useful outcome is a repeatable process, not the maximum number of advertised adjustments. No comfort, cooling, or durability claim is inferred from the empty mechanism’s ease of movement.
Compare storage with deployment
Measure the folded product, including protruding knobs and retainers. Decide where it is stored without loading it with heavy items or damaging nearby surfaces. Check the method for securing folded legs if the product provides one. Keep the tray’s storage instructions separate from its operating support requirements.
Count the loose items needed to deploy it: charger, mouse, phone stand, notebook, or another accessory. A slim folded tray can still create a large kit. Compare that whole kit with using an existing supported work surface, particularly if the task happens every day.
Retain packaging and instructions until the actual fit and ordinary supported transitions have been checked. If a required measurement is uncertain, contact the manufacturer rather than modifying the legs or top. The product should fit the intended use through its documented design, not through a collection of improvised changes.
Six measurements and actions to record
Permitted support
Record the tray’s intended surfaces, use conditions, and load requirements alongside the laptop’s operating guidance. Do not let either product’s marketing description stand in for the other’s instructions. A tray advertised for a location is not proof that every computer may be operated there, especially if ventilation or support requirements cannot be maintained.
Outer stance
Measure the deployed feet and legs at the configurations you will actually use. Include protrusions beyond the top and the required contact area. If a foot cannot rest as intended, compare another supported position or product. Do not partially fold or narrow the structure outside its documented settings to make an apparent fit.
Inner clearance
Record clear width, underside height, braces, knobs, and the entry route. Compare the final seated position and the process of placing and removing the tray. A person fitting underneath while still does not establish that ordinary movement or exit is practical. Keep the handling routine part of the purchase decision.
Usable top
Outline the supported laptop and actual input devices, excluding recesses and features that cannot serve the task. Check permitted tilt and retention. A cup holder or phone slot is not general-purpose work area, and a large outer rectangle can conceal a smaller useful region. Keep the laptop fully supported rather than reclaiming space through overhang.
Adjustment sequence
Follow the specified loaded or unloaded procedure and identify where equipment goes during changes. Keep cables and fingers clear of moving parts. If a frequent transition requires too many handling steps, simplify the intended use or compare another arrangement. The available adjustment range and the practical daily routine are separate acceptance points.
Stop and store
Practice ending the task, handling cables, removing equipment where required, and folding the tray as instructed. Use a suitable landing location rather than balancing the loaded top on a furniture edge. A tray fits the room only when deployment, ordinary use, interruption, and storage can all happen within the documented conditions.
Put outer stance and inner room in separate columns
Imagine a hypothetical tray with a 600 mm top, a 660 mm deployed outer stance, and 520 mm of clear space between its legs. Those three widths answer different questions. The top concerns the equipment, the outer stance concerns the supporting surface, and the inner width concerns the space beneath. The figures are invented to explain the distinction, not ratings or recommendations for a real product.
If the intended support region is 640 mm wide, the 600 mm top may appear to fit while the 660 mm stance does not meet the proposed geometry. Do not reduce the stance by partly folding a leg unless that is a documented position. Compare another supported surface or product instead.
Likewise, a broad outer stance does not guarantee generous inner room. Braces and adjustment hardware can occupy space inside it. Record the actual clear shape, including height and the entry route, rather than treating one width as the complete fit decision.
Distinguish setup adjustment from mid-task adjustment
A product with several documented heights can be useful even if it should be configured before loading. The important question is whether that routine matches the task. If the user changes posture or activity frequently, an adjustment requiring unloading may become cumbersome. That is a workflow limitation to compare, not permission to loosen the mechanism under an unsupported load.
Write one complete transition: where the computer goes, how power remains appropriately routed, which loose items are removed, and how the tray is adjusted and reloaded. If the sequence depends on balancing equipment temporarily, revise it before regular use. A suitable landing surface should exist independently of the folding mechanism.
For a tray used in one fixed session state, folded storage and initial deployment may matter more than frequent adjustment. A simpler supported product can be appropriate. Do not favor the largest number of settings when only one is needed and another geometry provides a better fit.
Check what the product drawing leaves out
Ask for deployed foot dimensions at the intended settings, clear inner width and height, usable top, and any restrictions on loaded movement. Include the actual support surface and the laptop’s operating needs. A reply about top width or advertised device size does not answer those other questions.
Keep a rough sketch with uncertainty marked honestly. A planning outline can reject an obvious conflict, but it cannot certify a soft surface or an unsupported use. If the intended location remains unconfirmed, choose another documented arrangement rather than trying to make the tray fit through added blocks or improvised restraint.
Sources and scope
- SONGMICS folding-tray example - Example of model-specific height and angle features; no universal surface suitability or load limit is asserted.
- Apple operating support guidance - Computer operating conditions remain separate from tray marketing and geometry.
Editorial note: This is a research-based planning guide, not a hands-on product review. All worked scenarios are hypothetical. Measurements and compatibility must be confirmed for the exact equipment. Photography supplies context, not proof of a tested arrangement.
Photos are illustrative and come from free-license libraries such as Unsplash; diagrams are original to DeskFinds.