
Where to Put a Docking Station on a Small Desk
Affiliate Disclosure: We may earn a small commission on qualifying Amazon purchases at no extra cost to you. Full disclosure →
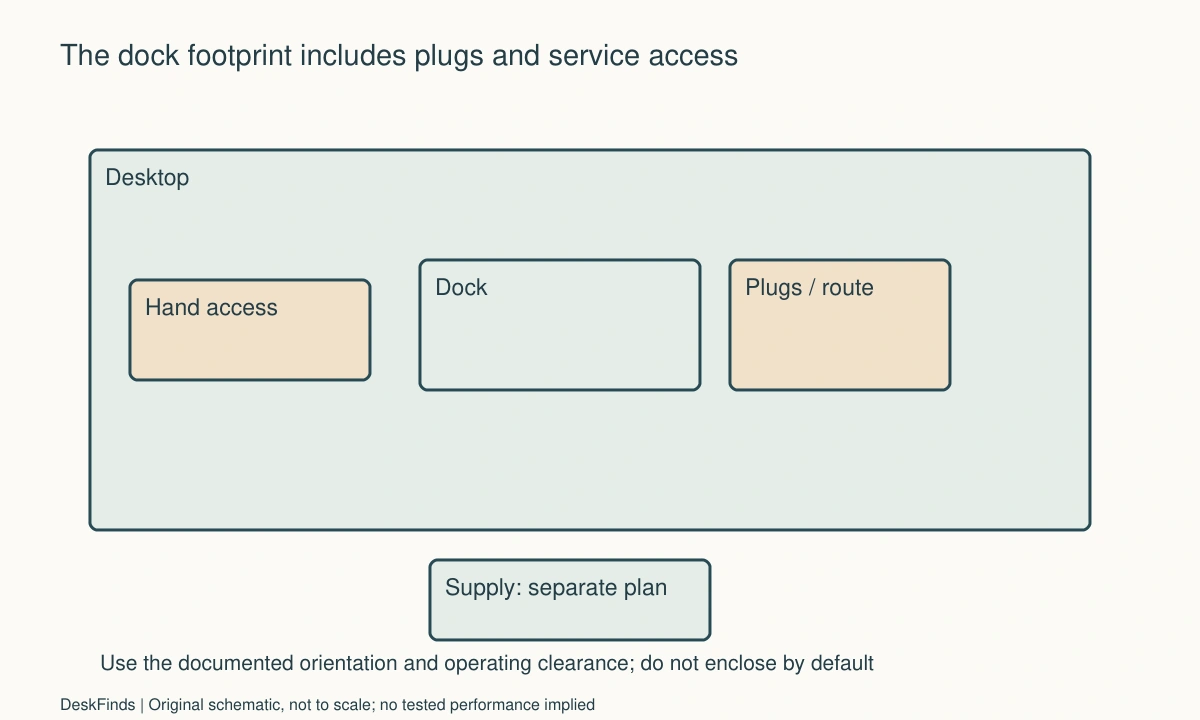
A docking station’s dimensions describe the enclosure, but the working setup includes plugs, cables, a power supply, and a hand reaching for removable devices. On a small desk, hiding the box can improve the view while making everyday use harder. Choose the location from the connections you touch most often and the operating conditions the manufacturer specifies.
Quick answer: Place the dock in a documented supported orientation with required operating clearance, relaxed cables, and reachable everyday ports. Measure its footprint with plugs installed and account for the power supply separately. Do not enclose, cover, or mount it using an improvised method simply to remove it from sight. Evaluate a front-access location, a rear location, and any manufacturer-supported mounting option as complete arrangements.
Sort the ports by how often you touch them
List permanent connections such as displays and Ethernet separately from daily connections such as a host cable, card reader, or removable drive. Mark any port whose button or indicator you need to see. This turns placement into a routine-use question rather than a competition to conceal the most equipment.
A rear location can work well when almost everything stays connected and a suitable host cable reaches the laptop naturally. A front-side location can be better when you frequently insert cards or unplug a drive. Neither is inherently more professional; the useful arrangement reduces awkward handling without sacrificing required operating conditions.
The one-cable compatibility checklist settles whether the dock can support the laptop. Placement is a separate decision. A perfectly located dock can still be electrically unsuitable, and a compatible dock can still be inconvenient behind an inaccessible screen.
Measure the connected footprint
Outline the enclosure, then add the actual plug bodies and the cable route beyond them. Include side-facing connectors that might encroach on the mouse area and rear connectors that need space before a wall. Product drawings can help, but use the actual supported cables when available.
Leave finger access for ordinary disconnection. A gap that accepts a plug may be too narrow to grasp it without pulling the wire. Consider whether a monitor arm moves through the same space or whether a laptop stand blocks the host connection when loaded. The working footprint changes when the devices around it move.
Do not select a right-angle adapter solely to force a cable into a tight space. Verify the adapter’s supported role and capabilities first. Moving the dock slightly may be a simpler solution than adding another interface that creates compatibility questions. A short cable is useful only if its route remains relaxed during normal use.
Treat heat management as model-specific
Read the dock’s operating-environment and heat-management guidance. The CalDigit SOHO manual includes a dedicated heat-management discussion, while the USB-C Pro Dock manual gives its own operating precautions. These are examples of information to consult for the selected model, not universal limits for all docks.
Do not diagnose normal or abnormal operation by touching an enclosure and comparing it with another product. A surface that feels warm does not establish a fault, and a cool exterior does not prove that covering the device is acceptable. Report unusual behavior and follow the manufacturer’s support guidance rather than inventing a safe temperature threshold.
Keep papers, clothing, and soft materials from turning a clear location into an unsupported covered state. If the desk regularly fills with notebooks, reserve the dock’s operating area so it remains usable throughout the day. The location should work under your normal habits, not just during the setup photograph.

Compare three practical locations
A desktop-side location offers visible status and accessible removable ports. Its tradeoff is loss of surface area and possible interference with mouse movement or handwriting. Check the connected width, not just the box, and place the device outside the ordinary forearm route.
A rear desktop location can keep persistent cables away from the work zone. Check the distance to the wall, monitor-arm travel, and the host cable’s route. You should still be able to identify and unplug the relevant lead without lifting a display or reaching blindly through a bundle of connectors.
An under-desk or vertical arrangement should use a compatible supported method and orientation. Verify the mount, surface, load, operating clearance, and release access. Do not assume adhesive pads or an arbitrary bracket are suitable because the dock is small. If the manufacturer offers no support for the proposed installation, a conventional clear surface can be the more practical choice.
Give the power supply its own plan
The dock’s brick can be larger and heavier than expected. Include its dimensions, supported operating conditions, and access to the outlet. Avoid suspending it from a cable, burying it in loose fabrics, or placing it where a foot can repeatedly strike the connection.
Keep its leads distinguishable from the laptop’s separate charger if both are present. A matching-looking connector does not establish electrical interchangeability. Preserve the model information and use the documented supply. Cable labels can identify destinations without covering warnings or technical information.
The docking station versus hub guide helps explain why the complete power arrangement may differ between devices. A smaller bus-powered hub is not automatically equivalent to a powered dock, and a larger dock is not automatically necessary for every desk.
Check the moving states
If the monitor adjusts, the laptop is removed daily, or the desk changes height, test the documented movement with cables connected. Watch the entire route, including the outlet end. A cable can appear loose on the desktop and still become taut behind a moving support.
Keep the dock supported independently of the host lead. Do not use cable tension to hold it against a monitor base. Avoid loops in the chair path and cables pinched by drawers. If a cable-management tray is used, it should preserve access and operating requirements rather than becoming an opaque container for every electrical device.
For removable storage at the dock, use the portable SSD placement guide. Positioning the SSD where you can see and eject it is part of the departure routine, even when the dock itself stays fixed.
Worked example: rear placement saved less space than expected
Consider a hypothetical worker with a shallow desk, one monitor, and a dock used for a laptop and camera. The initial plan puts the dock directly behind the monitor against the wall. The enclosure fits, but the rear video plug and power connector do not have a comfortable route.
The worker draws the connected footprint and discovers that the monitor would need to move forward. That reduces the paper-writing area at the front. The hidden location also makes a frequently used card slot difficult to reach. The tidy-looking proposal consumes more useful work space than its product dimensions suggested.
A side location is then tested with a paper outline and the intended cables. Permanent leads run toward the rear, while the host cable and card access face the user. The power supply receives a separate supported location. The dock is visible, but the monitor can stay farther back and the writing area remains available.
A third option uses a manufacturer-supported mount, if available for the actual product. Its installation, release, and operating conditions are checked before it enters the final comparison. In this example, the choice is not based on an assumption that mounting always improves cooling or that visible hardware is undesirable. It is based on complete footprint and daily access.
Avoid solving an access problem with repeated unplugging
If you disconnect the wrong lead because the host port is hidden, improve identification and placement rather than accepting the mistake as part of the routine. If a drive needs to be ejected, put that step before disconnecting the host cable. A dock’s single cable can remove several peripherals at once, so the software and physical sequences should agree.
If the camera stops working only through the dock, separate that issue from placement. Use the USB camera and microphone check to compare a direct supported path. Repeatedly moving the dock or adding a fan does not establish the cause of an electrical or application problem.
A small service gap can save substantial future effort. Keep the product label readable and the supply identifiable. When an accessory changes, update the connection drawing rather than adding a new cable to an undocumented bundle. This is especially useful on a shared desk where another person may need to restore the arrangement.
Placement review before you commit
Permanent versus temporary ports
Mark every port you touch at least during a normal workweek. Test reaching it with the monitor and laptop in their real positions. If the permanent-cable location hides the temporary ports, compare rotating or moving the dock only if that orientation is supported. Do not trade everyday accessibility for a perfectly hidden rear view that you rarely see.
Connected dimensions
Measure the enclosure with the intended plugs and cable exits. Include adjacent wall clearance and any monitor-arm movement. An online body dimension is only the starting point. If a paper outline fits but the connected setup does not, revise the location before looking for adapters; the shape of the whole arrangement determines practical space use.
Operating instructions
Record the permitted orientation and any stated operating precautions. Keep the dock clear during a representative work session, including when books and bags return to the desk. If an enclosed or mounted location is not confirmed, leave it unresolved rather than treating silence in a product listing as approval. Use the manufacturer’s answer for the exact model.
Power-supply support
Check that the brick has a stable permitted location and that neither lead carries its weight. Identify its outlet and leave a way to disconnect it when required by the instructions. A hidden supply is still part of the setup. If reaching it requires dragging furniture, compare another supported placement while the desk is still easy to rearrange.
Movement and departure
Move only through the equipment’s supported ordinary range while observing the cables. Practice removing the laptop after saving work and disconnecting removable storage correctly. Check that the host plug can be grasped without shifting the dock. A placement that works only when the laptop never moves may not suit a desk designed for daily travel.
Future service
Keep a simple diagram naming host, displays, camera, network, storage, and power. Check whether another person could identify the host cable without trial and error. Leave technical labels visible and retain the supplied cable information. A serviceable dock location is one you can understand and restore after cleaning or replacing an accessory, not merely one that looks uncluttered today.
Compare visible access with hidden service time
Estimate which ports you touch daily, weekly, and only during installation. A dock that is visible but easy to use may save more effort than a hidden dock that requires moving the monitor to reach a card slot. The comparison should include ordinary access and occasional service, not just the initial desk photograph.
If you rarely touch the enclosure, a rear position may be practical when the operating requirements and connected footprint fit. If you frequently swap cards or storage, a side position may be more useful. A remote power or host-control feature, where documented, can change the access requirement, but it does not eliminate cable service or operating clearance.
Do not spend money on a mount before testing whether another supported desktop position meets the requirement. Include the mount’s cost, installation permission, supported orientation, and release procedure. A mount is an accessory to a compatible operating arrangement; it should not be treated as evidence that any hidden location becomes suitable.
A second scenario: a shared desk needed the front ports
Imagine a hypothetical room where two users connect different laptops at different times. One user leaves everything attached, while the other imports photos from a card several times a week. The first proposed layout hides the dock behind a display because that suits the permanent-cable routine.
The users list their actual port interactions. The card user would have to reach around the screen, and the host cable would be difficult to distinguish from another USB-C lead. A side location is then outlined with the screen, notebook, and mouse present. The dock remains visible, but both temporary connections can be reached without moving other equipment.
They check operating instructions and connected plug clearance in that position. The power supply receives its own supported location rather than being squeezed into the remaining gap. The host cable is identified by destination, and each laptop’s compatibility remains documented separately. Convenient port access is not used to imply that both computers receive identical functions.
The final hypothetical arrangement includes a clear return state for the card reader and any removable drive. Before changing hosts, users follow the required storage-disconnection routine. The dock’s location makes that action easier to remember because the relevant ports are visible and reachable. The desk remains shared without depending on either person’s memory of a hidden cable bundle.
This example does not claim that a side location cools better or that rear placement is inherently unsuitable. It shows that the frequency and type of port use can decide where a compatible dock belongs. The best location can change when the users or workflow change.
Recheck placement when accessories are added
A new monitor, rigid adapter, or high-use USB device can change the practical footprint. Update the connected outline before adding the cable to the existing route. A rear gap that was sufficient for one plug may not accommodate a different connector body or the access needed to remove it correctly.
If a new accessory produces a reliability problem, separate that issue from the physical placement review. Record the connection chain and compare supported paths rather than assuming extra warmth or cable crowding proves the cause. Use official troubleshooting for the actual device, and keep the dock’s operating area clear while investigating.
Review the end-of-day state as well as the working state. A notebook placed over the dock after work, a bag pushed against its supply, or a chair pulling a lead can alter the arrangement after the user stops looking at it. Choose a location that remains within instructions through the normal room routine, with a clear way to restore it after cleaning or handover.
Sources and scope
- CalDigit SOHO manual - Model-specific heat-management and connection guidance.
- CalDigit USB-C Pro manual - Model-specific operating precautions; numerical limits are not generalized.
Editorial note: This is a research-based planning guide, not a hands-on product review. All worked scenarios are hypothetical. Measurements and compatibility must be confirmed for the exact equipment. Photography supplies context, not proof of a tested arrangement.
Photos are illustrative and come from free-license libraries such as Unsplash; diagrams are original to DeskFinds.