
How to Place a Whiteboard in a Small Room for Writing and Video Calls

Affiliate Disclosure: We may earn a small commission on qualifying Amazon purchases at no extra cost to you. Full disclosure →
A whiteboard can fit on a wall while being awkward to write on or difficult for a camera to show. Its frame, tray, mounting hardware, writing position, and reflections create a larger planning problem than a rectangular panel alone. Decide whether the board is primarily for personal notes, live explanation, or both before choosing its location.
Quick answer: Outline the board’s complete installed or deployed size and the area you can actually write on. Check the mounting instructions, ordinary hand reach, camera view, and room-light reflections separately. Include marker and eraser access plus the room’s doors and furniture routes. A board visible to you is not automatically readable in a video call, and a wall that accepts its outline is not proof of mounting suitability.
Define personal notes versus live sharing
List the content you intend to use: short reminders, a weekly plan, diagrams, calculations, or a live explanation. A small note board can serve personal reference while being too small or poorly placed for a remote audience. A larger presentation board can demand more wall and standing space than the room offers.
The whiteboard and corkboard comparison helps distinguish erasable writing from pinned reference material. Choose the function before the surface. A board should not be bought merely because an empty patch of wall appears available.
If the task is showing a small page or detailed handwriting, compare the document-camera guide. That can be another suitable presentation method without assuming a camera can read every detail written on a wall board across the room.
Measure usable writing area and full outline
Record the surface area inside the frame, overall width and height, tray projection, and any stand or base. A nominal board size may not describe the exact writable region. Include mounting access and any removal route required by the product.
Mark the outline through an appropriate non-damaging planning method. Check nearby shelves, switches, vents, doors, and furniture. Do not cover required access or install over a surface without confirming the product’s mounting requirements and any relevant permissions.
For a freestanding product, use its documented base and operating position. A board intended for a wall should not be leaned against furniture as an assumed temporary stand. The whiteboard size guide provides category measurements, while the actual product instructions settle the installation.
Check ordinary writing reach
Stand or sit where the task will happen and outline the region you can use naturally without climbing, balancing, or reaching across unsuitable furniture. The board’s full height is not automatically usable writing area. A desk beneath it can limit access to the lower section or force an awkward approach.
Include the hand, arm, and body space used during drawing and erasing. A board beside a cabinet may clear the frame but not the movement needed to write at its edge. If another person presents, check their ordinary position separately rather than assuming one user’s reach is universal.
Use a supported board height and arrangement appropriate to the actual users and workplace guidance. This guide does not prescribe a medical posture or guarantee comfort. Keep observations concrete, such as a desk blocking the writing approach or a tray occupying a route.

Verify the camera’s useful frame
Open the real meeting application and use the intended camera position. Check whether the whole required writing region is visible and whether the smallest content can be read in the final shared view. A local preview or still photo can differ from the transmitted result.
Do not rely on writing tiny notes simply because the board has spare area. Adjust the presentation scale to the actual audience and supported camera workflow. If details remain unreadable, compare another capture method or show the content in appropriate sections rather than assuming digital zoom creates missing detail.
Include the presenter in the sequence. A person standing in front of the board can obscure the content, and moving aside changes framing needs. Check ordinary writing, pointing, and explaining with harmless material before relying on the setup for an important call.
Compare reflections and room light
Inspect the board from the camera’s viewpoint as well as your own. A bright patch may appear only in the camera angle. Windows, ceiling lights, and task lamps can all contribute, and the surface material matters. Do not assume a glass or glossy board will behave like another finish.
Use supported changes in board, camera, or light placement one at a time. Do not modify the board surface or cover a light with improvised material to improve one test image. The ring-light placement guide addresses a related reflection comparison for a different subject.
Keep ordinary room lighting practical for other tasks and users. A camera view that works only when the room is inconveniently dark may be unsuitable for frequent use. Compare the real daytime and evening arrangements rather than one staged condition.
Choose supplies for the actual surface
Read the board maker’s marker, eraser, cleaning, and mounting guidance. Quartet’s product information distinguishes board and accessory requirements; use the exact product’s instructions rather than assuming every marker or cleaner works on every surface.
The magnetic and non-magnetic whiteboard guide covers another feature distinction. Magnetic function does not make the board a general load-bearing storage panel. Use accessories only within their intended roles and do not attach heavy organizers without documented support.
Give markers and erasers a reachable suitable place. A tray can project into a walking route or collect unrelated clutter. Keep supplies available without making the writing area a storage shelf, and follow care guidance when marks or residue do not erase as expected.
Worked example: the board fit above the desk but could not be used fully
Imagine a hypothetical student choosing a board for the wall behind a desk. The panel outline fits neatly between shelves. The first plan does not include the body position needed to write, and the desk depth makes the upper and lower sections inconvenient to reach.
The student outlines the actual usable writing region and compares another permitted location or a smaller suitable board. The student does not stand on furniture or lean across a monitor to use the full advertised area. The room’s access and mounting requirements remain part of the comparison.
If the board is mainly for short personal notes, a smaller reachable region may be sufficient. If live explanations need a larger area, another presentation method or room arrangement may be necessary. The product size is chosen after the task and access are understood.
The hypothetical result is a board whose useful area matches ordinary use, or a decision to choose another method. No claim is made that a mounting system or writing posture was tested. The example shows why a clear wall rectangle is not the same as a usable writing station.

A second scenario: the remote view hid the useful content
Consider a hypothetical tutor with a board that is easy to use in person. During a private call check, a reflection obscures part of the diagram, and the camera framing leaves little room for the tutor to move aside. The tutor initially assumes a higher-resolution camera is the only solution.
The tutor checks the actual application view, supported camera location, board position, and lighting separately. A different permitted angle may help, but the board must remain properly mounted and reachable. The tutor does not tilt a wall-mounted board on improvised spacers or alter its surface to rescue the first arrangement.
The tutor also compares a document-camera view for detailed work and a larger-scale board explanation for broad ideas. Each method is assessed in the final shared output. A camera specification does not guarantee that every handwritten label will be readable across a room.
The final hypothetical plan records the useful writing region, presenter position, camera frame, and room-light state. It is recoverable after the desk is used for another task. The example illustrates workflow and geometry without claiming a benchmark or a universal glare-free surface.
Keep notes and privacy intentional
A board visible in a call or from a shared doorway can reveal information left after another task. Clear, cover, or otherwise manage it through an appropriate supported method before sharing the view. A camera crop is not a substitute for following relevant privacy requirements.
For shared use, agree on which notes may be erased and how unfinished work is preserved appropriately. A photograph can be useful only when permitted and stored through the relevant process. Do not capture confidential material casually while testing the camera.
Maintain a clear reset state: intended notes, suitable supplies, clean surface through the maker’s method, and no unrelated objects attached. This helps the board remain useful rather than becoming another permanent mixed storage area on the wall.
Six checks for the writing-and-camera arrangement
Purpose and scale
Name the personal or live-sharing task and the detail that must be read. Compare a board with another appropriate capture method where relevant. A large writable rectangle is not automatically useful if the task needs small detailed text that the chosen camera path cannot convey. Let the actual content determine the required working area.
Mounting and outline
Measure the frame, tray, base where applicable, and required installation access. Verify the surface, hardware, permissions, and product instructions. Do not lean a wall board against furniture as an assumed stand or modify the mount to obtain a camera angle. A correct physical installation is separate from writing and image suitability.
User approach
Check ordinary writing, pointing, and erasing with the desk and furniture present. Include the real users and their practical reach. Do not count areas that require climbing or balancing as usable capacity. If the board cannot be approached appropriately, compare another location or size instead of relying on the empty wall measurement.
Shared image
Verify the required content and presenter movement in the actual meeting or capture output. Use harmless material and check crop, orientation, and readability. A clear local still image is not enough. If details remain unsuitable, revise the supported framing or presentation method rather than assuming another digital setting adds missing information.
Surface and light
Use compatible markers and care methods, and assess reflections from the camera and user viewpoints. Change supported geometry one variable at a time. Do not apply an improvised coating or light covering. The room state should remain practical for ordinary work and other occupants while the board is used.
Supplies and reset
Keep markers, erasers, and permitted accessories reachable without blocking routes. Manage private or shared notes through the appropriate process before calls. Restore the intended state after use. A useful small-room board supports writing, viewing, care, and privacy as a repeatable routine rather than only fitting a spare patch of wall.
Calculate usable writing area honestly
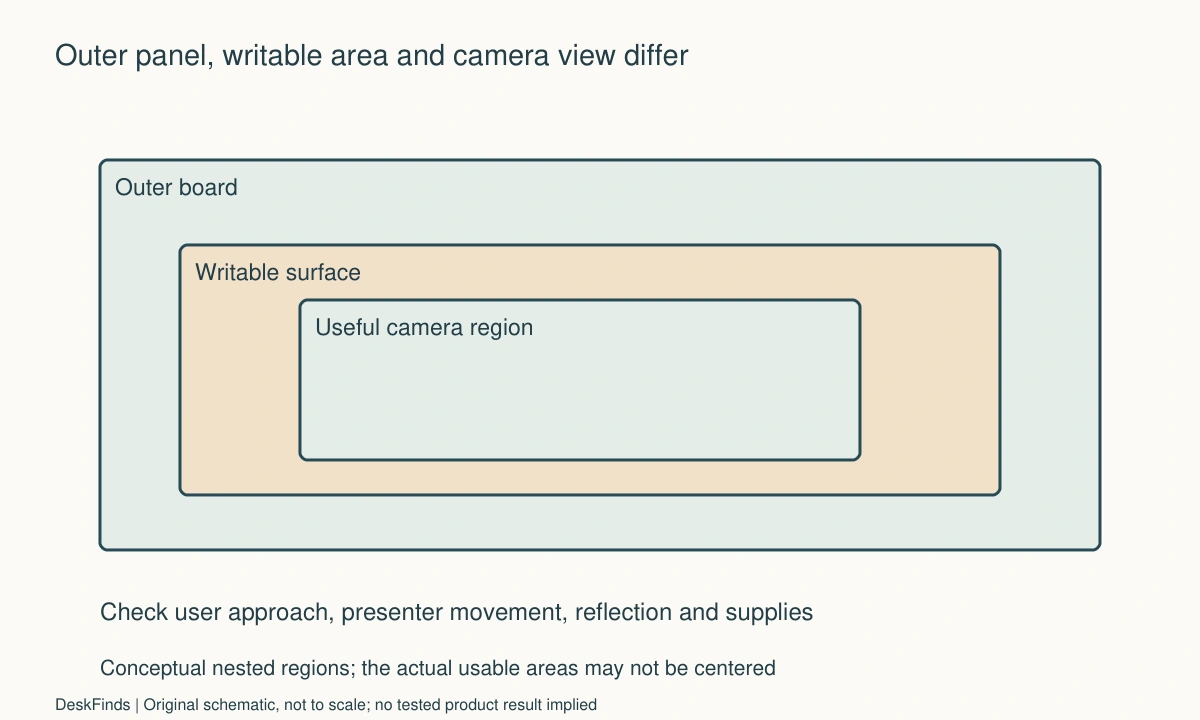
Suppose a hypothetical board’s outer width is 600 mm and the frame occupies 20 mm on each side. The conceptual clear width is 560 mm before any other product-specific features. Those invented figures illustrate why the nominal outside dimension and usable surface are different measurements; they are not specifications for a named board.
Then mark the region you can actually approach and use with the desk and furniture present. A physically writable surface may be less useful where a monitor blocks the hand route. Do not count the full panel as practical capacity when ordinary writing would require climbing or balancing.
For a camera task, place a second rectangle around the content that remains readable in the final shared view. That region can differ from both the outer panel and the personal writing area. Keeping all three outlines separate prevents a successful wall fit from being treated as proof of a useful remote presentation.

Compare location with writing scale
A board close to the camera may offer another image scale while changing presenter space or room access. A farther board can fit more comfortably on the wall but require larger writing. Evaluate the actual application output and harmless representative content rather than assuming a camera specification resolves every distance.
Do not make a cramped frame work by writing smaller than the audience can read. Compare a supported change in framing, a different board location, content shown in sections, or another capture method. Digital zoom and crop have their own role but should not be described as creating missing detail.
If the board is mainly for personal reminders, the camera requirement may be unnecessary. Keep optional live-sharing ambitions from driving an oversized installation that makes daily notes awkward. Conversely, a board chosen for tiny personal notes should not be accepted as a teaching surface without the actual audience view being checked.
Treat surface features as separate functions
Magnetic capability can help with compatible lightweight accessories where intended, but it does not approve arbitrary hanging loads. A smooth-looking surface does not establish that every marker or cleaner is suitable. Use the exact board and accessory guidance, including mounting and care requirements.
A tray can keep supplies accessible while projecting into a route or reducing clearance above furniture. Include it in the installed outline and check ordinary hand access. If the tray becomes a storage shelf for unrelated objects, restore the intended use rather than assuming every small item belongs there.
If a mark does not erase, follow the product’s care process. Do not escalate through improvised solvents or surface treatments. A board that is clean and compatible with its supplies is a different question from whether the camera captures it well; keep those observations separate during troubleshooting.
Prepare a repeatable presentation state
Record the supported board location, useful writing region, camera framing, presenter position, and ordinary room-light condition. Use harmless sample content when restoring the setup. This is a deployment aid, not evidence of a measured resolution or glare rating.
Before sharing, manage private notes and verify the intended camera or window. During the task, leave room for pointing and stepping aside without blocking the whole diagram. Afterward, preserve shared work only through an appropriate permitted process and restore supplies and surface care as instructed.
For a shared room, agree on what may be erased and who restores the default state. A useful board system remains understandable after another person’s session. Its value comes from accessible writing and a readable intended view, not simply the amount of wall area filled by a panel.
Sources and scope
- Quartet product FAQs - Product-specific mounting and care context; actual board, marker and accessory instructions remain the reference.
Editorial note: This is a research-based planning guide, not a hands-on product review. All worked scenarios are hypothetical. Measurements and compatibility must be confirmed for the exact equipment. Photography supplies context, not proof of a tested arrangement.
Photos are illustrative and come from free-license libraries such as Unsplash; diagrams are original to DeskFinds.