
How to Fit a Document Camera and a Full Page on a Small Desk

Affiliate Disclosure: We may earn a small commission on qualifying Amazon purchases at no extra cost to you. Full disclosure →
A document camera’s base can fit in a spare corner while the page it needs to capture does not. Camera height, page size, arm position, and the space used by a writing hand determine the real working footprint. Plan the capture area first, then place the camera and computer around it.
Quick answer: Choose the actual document size and task, then check the camera’s documented coverage and supported position. Verify the full page in the application used for sharing or capture, including edges and writing movement. Keep the base, arm, cable, and lighting clear of that area. A camera preview that shows most of a sheet is not proof that the entire page remains readable in the final shared view.
Define live demonstration versus scanning
Decide whether you need to show handwriting live, display a static page, record a demonstration, or create a saved document. Those tasks place different demands on focus, controls, file handling, and hand space. A device that captures a page occasionally may not suit frequent live annotation.
For a saved-paper workflow, compare the scanning and physical-storage comparison. A document camera can be useful for suitable capture tasks, but it should not be assumed to replace every scanner or provide verified OCR accuracy. Check the actual output and document requirements.
List the largest ordinary page, an open book if relevant, and any object shown. Do not compare only a convenient small sheet. The purchase should support the task that motivates it, including page changes and the user’s hands.
Establish the capture rectangle
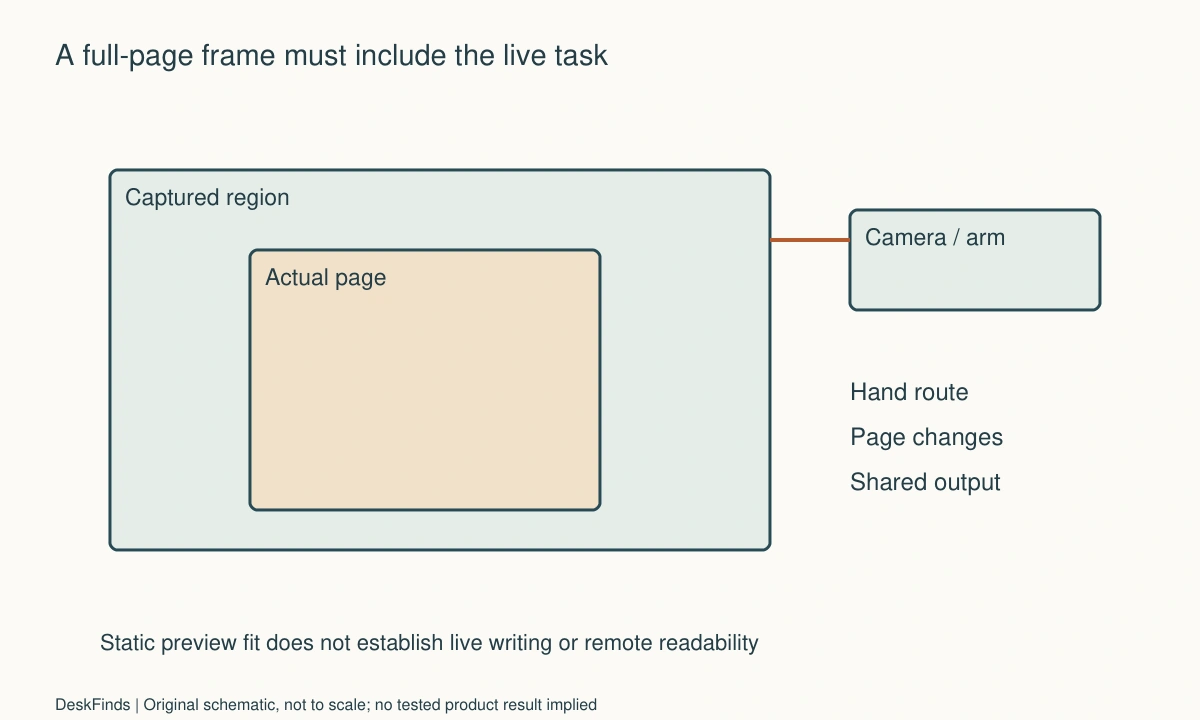
Use the device’s documented coverage information for the proposed supported height and orientation. Then verify the real page in the intended software. The view can be affected by selected mode, crop, rotation, or the application used to share it.
Mark a suitable non-damaging boundary on a planning sheet or use supported software guides where available. Keep all relevant corners visible and allow room for ordinary page placement. A tight crop that requires exact alignment each time can be impractical for live work.
If a phone is an alternative, see the overhead phone mount guide. Its camera behavior, holder, and connection workflow need independent checking. A phone’s wide lens or high resolution does not establish the same usable document area as a dedicated camera.
Check the base and arm outside the page area
Outline the full base, arm, head, and cable exit in the intended position. Follow the camera’s support and adjustment instructions. A folding arm can occupy different space during deployment and operation, and a narrow base still needs suitable contact with the surface.
Keep the camera’s structure out of the writing hand’s ordinary route. Check both handedness and the direction in which pages are turned. A support beside the sheet can be convenient for one task and intrusive for another. Do not use the arm as a paper stop unless the product is intended for that role.
If the page and keyboard compete for the center, create deliberate capture and typing states. Give the keyboard a supported parking place and keep the cable route relaxed. Avoid stacking input devices on the camera base to reclaim an apparent strip of surface.

Check focus on the content that matters
Use representative small text, handwriting, and any detail the audience must read. IPEVO’s Visualizer documentation illustrates focus and other software controls, some limited to selected models. Check the actual camera and software version rather than assuming every device provides every control.
If the camera supports an appropriate focus lock, compare its use for the task through official instructions. A writing hand can change what appears in view, so assess the live sequence, not just a stationary page. Do not assume a sharper preview guarantees that remote viewers receive the same detail after sharing.
For a saved capture, inspect the resulting file separately. Confirm page edges, orientation, legibility, and destination. If searchable text or exact data entry matters, verify those results through an appropriate process rather than treating a successful capture message as proof of accuracy.
Light the page without hiding it in glare
Check the whole page under ordinary room conditions. Glossy paper, a book curve, or a moving hand can create bright patches or shadows. Use the camera’s built-in light only as documented, and compare any task lamp in its supported positions.
Do not cover a light with improvised diffusion or place it against paper to reduce glare. Change supported geometry and settings where appropriate. A brighter page is not automatically more readable if a reflection obscures the text or the camera changes exposure unfavorably.
The ring-light placement guide addresses a different reflective task. A light arranged for a face may need a separate supported configuration for paper. Avoid assuming one permanent light position serves both camera views equally well.
Verify the actual sharing path
Check how the camera enters the meeting or presentation application: direct camera selection, a supported software window, or another documented path. Confirm permissions and managed-computer restrictions before relying on extra software. A USB connector fitting the host does not settle the sharing workflow.
Test what the audience sees, including rotation, crop, and readability. A mirrored local preview can be misleading if the shared output differs. Use harmless text and a private trial where possible. Do not expose private documents while experimenting with window sharing.
The docking-station troubleshooting guide offers related checks when a dock is part of the camera connection. Follow camera-specific support first and distinguish a connection failure from incorrect application selection or sharing the wrong window.
Worked example: the page fit until the user started writing
Imagine a hypothetical tutor whose document camera can show a sheet in a static preview. The tutor places it beside the laptop and nearly considers the desk complete. During a sample explanation, the writing hand meets the camera support and pushes the paper outside the captured region.
The tutor outlines the hand route and page-turning action as well as the page itself. A different supported camera position is compared with a deliberate keyboard parking state. The tutor does not move the base partly beyond the desk or extend the arm outside its documented range to preserve the first arrangement.
The actual meeting application is checked with harmless sample work. The tutor verifies that the complete writing area remains visible after sharing, not merely in the camera software. Focus behavior and page lighting are assessed during the ordinary demonstration sequence.
The hypothetical result is a capture state that serves movement as well as a still page. It may occupy the central desk area while in use and be packed away afterward. No claim is made that a particular camera passed a measured field-of-view or autofocus test.
A second scenario: a high-resolution preview became a poor shared image
Consider a hypothetical worker who wants to show a printed diagram remotely. The camera software preview looks detailed, but the selected meeting-sharing method crops or resizes the view. Some labels are difficult for the audience to read.
The worker checks the supported sharing paths and the actual output rather than buying another camera immediately. The camera, page, and lighting remain consistent while the sharing method is compared. If a particular application setting changes the result, it is recorded separately from physical camera placement.
The worker also considers showing the diagram in sections through a supported workflow when full-page readability is insufficient. That is a presentation decision, not a claim that digital zoom creates missing detail. The original page remains available, and any saved capture is checked independently.
The final hypothetical arrangement names the camera mode, software, sharing path, and page position. It does not assume a megapixel number guarantees remote legibility. The useful evidence is that the intended audience can read the required content through the supported path used in the real task.
Plan deployment and storage
Check the documented unfolding, adjustment, shutdown, and storage procedure. A camera that folds compactly can still need temporary space while opening. Keep cables from being pinched by joints and avoid packing the device with a rigid plug under pressure inside a tight bag.
Store compatible leads and any permitted accessories together. A short deployment note can name the camera input, software window, page orientation, and expected capture area without containing private material. This makes a shared desk easier to restore after another task.
If setup is needed many times a day, compare the full transition with leaving a suitable camera position deployed. If the desk must be cleared after each session, folded size and protected storage matter more. Judge the routine you will repeat, not just the smallest product body.
Six acceptance checks for a page camera
Representative material
Use the actual page size, binding type, and detail level that motivates the purchase. Include an open book or object only if the camera and support are suitable for it. A small demonstration card does not establish full-page coverage. Keep valuable or private originals out of exploratory trials and use harmless representative material where possible.
Complete capture area
Verify all needed edges in the intended application and mode, with room for ordinary placement variation. Check the final shared or saved result separately from the local preview. A tight static fit can become unreliable during live handling. Record the supported camera position and software state so the working area can be restored predictably.
Hand and paper movement
Write, point, and turn pages through the ordinary task while keeping equipment supported. Check the camera arm, base, and nearby keyboard against those routes. If a conflict occurs, compare another documented position or a deliberate task state. Do not gain space through partial base support or an unsupported arm extension.
Focus and light
Check the text and detail the audience needs, including hand movement and ordinary lighting. Use only the controls provided for the actual camera and software. A model-specific focus feature should not be assumed universal. Avoid improvised light coverings and judge readability rather than maximum brightness or a single attractive still frame.
Host and sharing
Record the connection, permissions, software, and application-sharing path. Confirm the intended camera or window is selected and that private content stays out of view. A device appearing in the OS does not prove the meeting uses it correctly. Resolve software restrictions before making the camera central to a time-sensitive teaching or work routine.
Pack-away state
Follow the documented shutdown, disconnection, folding, and protection steps. Give papers and accessories clear destinations before the desk changes tasks. A compact station is complete when the next session can begin from a known configuration, without searching for the correct cable or rediscovering which application window must be shared.
Work through a full-page planning example
A hypothetical sheet measuring 210 by 297 mm needs a useful captured region larger than a single point at its center. Suppose the proposed supported setup shows a 230 by 310 mm region in the intended mode. The arithmetic leaves 20 mm of total width margin and 13 mm of total height margin before considering ordinary placement variation. These invented figures are not a camera specification or a recommended minimum margin.
Mark the full page and repeat its normal insertion, pointing, and writing actions. A tight static fit may not suit a live lesson if the page shifts during use. Do not solve the problem by extending the camera beyond its permitted range or assuming another video mode retains the same coverage.
If the task uses an open book, repeat the requirement with the actual spread and its ordinary page shape. A flat single sheet does not establish coverage or focus for a curved book. The support and handling needs of the original also remain separate from the camera’s ability to see it.
Choose a capture state around the most frequent action
For live writing, give the page and hand the central working region and park the keyboard appropriately. For occasional static reference, a camera that deploys briefly may be sufficient. For repeated typing between pages, count the transition actions before choosing a layout that requires moving several devices each time.
A supported freeze or snapshot feature, where available for the exact camera and software, can change the presentation routine. Verify it rather than assuming it exists. Such a feature may let the presenter change material without showing every movement, but it does not correct an unreadable capture or authorize use of private documents in a test.
Keep original analysis and product features distinct. The recommendation to compare task states is a planning method. Whether a camera supports manual focus, a light control, or a specific sharing path must come from the actual documentation.
Build a small acceptance page
Use harmless representative material containing the detail you need: ordinary handwriting, a few small labels, a diagram edge, and any relevant color distinction. It is not a calibration chart or an accuracy certification. Its purpose is to keep the content consistent while you compare supported positions and sharing methods.
Check the page in the local preview, final shared view, and saved output if those are part of the task. Record differences without blaming the camera automatically. A crop or application selection can change the audience’s view even when the physical page and camera remain still.
If a setting is changed, label it as another configuration. This prevents a sharper saved image from being mistaken for evidence that live sharing improved. The required result should be evaluated through the path used in the real session.
Questions to ask before ordering
Provide the actual document size, whether hands move in view, the host and application, the required connection, and the available working surface. Ask for documented coverage in the intended mode and any relevant software restrictions. A megapixel count or folded height does not answer those practical questions.
If the camera cannot be confirmed for the intended task, compare another model or an appropriate alternative capture method. A simple supported workflow with a clear page area can be more useful than a feature-rich device whose arm, software, or sharing requirements cannot fit the desk and host.
Sources and scope
- IPEVO Visualizer features - Illustrates software controls and model-specific feature availability; no coverage, OCR or remote-legibility guarantee is inferred.
Editorial note: This is a research-based planning guide, not a hands-on product review. All worked scenarios are hypothetical. Measurements and compatibility must be confirmed for the exact equipment. Photography supplies context, not proof of a tested arrangement.
Photos are illustrative and come from free-license libraries such as Unsplash; diagrams are original to DeskFinds.