
How to Plan KVM Cables for Two Laptops on One Small Desk
Affiliate Disclosure: We may earn a small commission on qualifying Amazon purchases at no extra cost to you. Full disclosure →
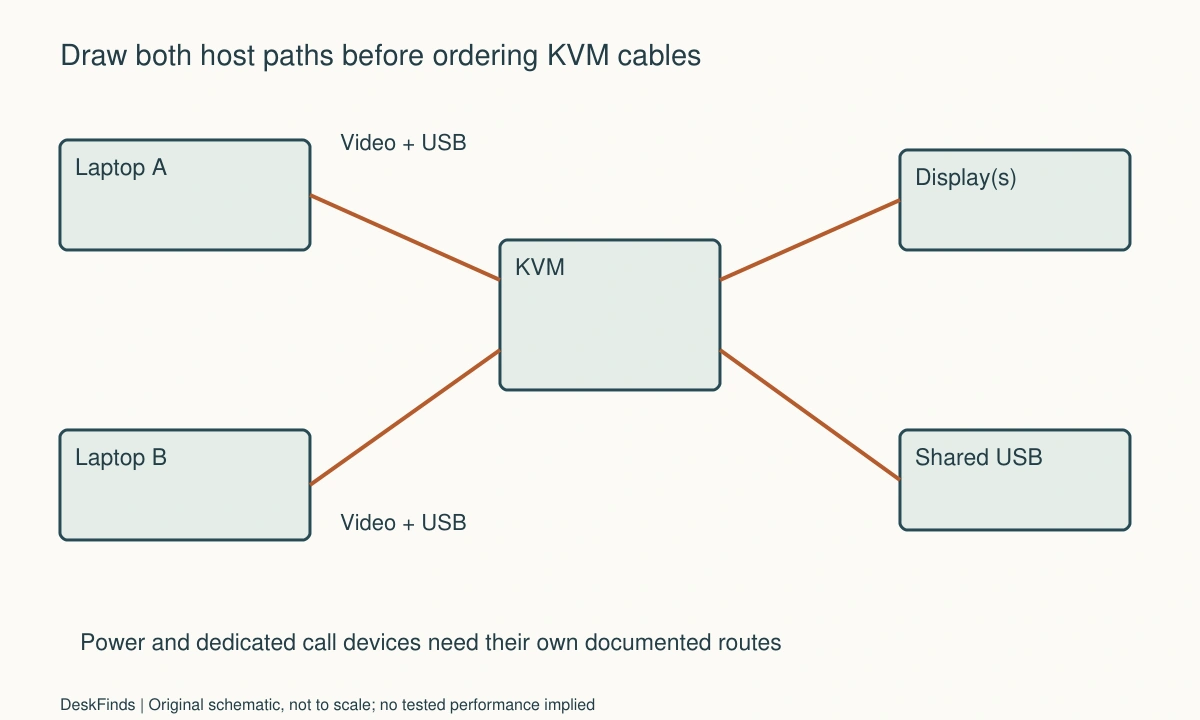
A two-laptop desk can look simple from the front and become surprisingly complicated behind the monitors. A KVM switches keyboard, video, and mouse functions, but it does not automatically supply every laptop connection or charge both machines. The way to avoid a box full of wrong cables is to draw both complete host paths before choosing the switch.
Quick answer: Map each laptop’s video output and USB upstream connection to the KVM, then map the KVM’s monitor and peripheral outputs. Check the exact display mode, number of monitors, USB device support, and power arrangement for both hosts. Include any docks and adapters as separate devices. A KVM’s advertised output capability does not create a missing display output on a laptop.
Decide what should move when you press the button
List the shared equipment: one or two monitors, keyboard, mouse, webcam, microphone, speakers, and any other device. Some items may be better dedicated to one laptop. A work camera that must stay connected during a meeting should not disappear because you briefly switch your keyboard to the other computer.
Distinguish switching the whole desk from switching input devices only. If you are content to select monitor inputs manually, a USB sharing switch may meet the need with fewer video-compatibility questions. Compare that arrangement in the USB switch planning guide. If one coordinated switch action is important, keep a KVM in the shortlist.
Write down which laptop owns audio during a call. A common mistake is to plan the screens carefully and assume the microphone follows the same route. It may be connected separately, selected in software, or unsupported by a keyboard-only USB port. Make ownership explicit for every shared device.
Draw host A and host B separately
For each laptop, identify the actual video-capable ports and supported display count. Record the resolution and refresh rate required on every shared monitor. Do not assume that because host A supports the plan, host B will behave identically. Different OS support, port capabilities, or managed-device restrictions can change the usable arrangement.
Draw a line from each host video output to the corresponding KVM input. A typical dual-display KVM needs the specified video feeds from each host; two monitor sockets on its output side do not manufacture two independent source streams. If a dock supplies those feeds, confirm the dock’s host compatibility first.
The one-cable dock compatibility guide helps check that upstream portion. A supported dock-plus-KVM arrangement is possible, but stacking devices should be a considered choice. Every extra interface creates another specification and physical connection to account for.
Keep USB upstream separate from video
Traditional KVM arrangements commonly have a USB connection from each host in addition to video. Identify the host-side USB upstream ports and the console-side device ports in the product manual. Labels such as computer and console matter; plugging a cable into a port that physically accepts it is not a wiring plan.
Some models combine functions in a USB-C host connection. Confirm the exact supported functions, including host charging if advertised. Do not generalize from that model to all KVMs, or assume every USB-C cable carries the required data and video. Use the supplied or documented host cable and the manufacturer’s connection diagram.
For a device-category overview, see KVM switches explained. This article’s task is to turn that concept into a complete cable bill. Number the cables by host so you can troubleshoot one path without unplugging the other laptop’s working arrangement.
Match the whole video mode
Check display count, resolution, refresh rate, and the specific connection standard together. If your monitor uses variable refresh or another specialized feature, obtain explicit support confirmation rather than assuming it passes through. An office-oriented KVM that supports your resolution at one refresh rate may not support the mode used for gaming.
Adapters have direction and mode limits. A cable sold for a DisplayPort source feeding an HDMI display should not be assumed to operate in reverse. Prefer documented direct connections when possible. If conversion is unavoidable, include the exact adapter model in the compatibility question to the KVM maker.
Protected video and monitor identification behavior can also matter. Ask about the features required by your work rather than buying on an unexplained acronym. A KVM that preserves a display’s identity during switching may behave differently from one that makes the computer detect a disconnect. Check model documentation and observe window behavior during an ordinary trial.
Plan power without assumptions
A KVM can require its own supply while providing no laptop charging. A dock may power one laptop, a pass-through KVM may need a separate charger for each supported host path, or both laptops may retain their normal chargers. Read the exact power diagram and count all supplies.
Do not connect two computers with an ordinary improvised USB cable in an attempt to share peripherals. Use a device designed for the role and follow its host-port instructions. If the KVM’s optional auxiliary power is required for your peripherals, use only the supported supply arrangement rather than choosing an arbitrary spare adapter.
On a small desk, power supplies need a location as much as the switch does. Include cable strain relief, accessible sockets, and operating clearance. Avoid letting a heavy brick hang from a thin lead behind a monitor. The tidy view from the chair should not hide unsupported equipment or taut connections.
Put the selector where it can be used
Choose whether the switch body, a wired remote, or a supported hotkey will be the daily control. A remote button can let the main box sit farther back, but its lead still needs a route. Keep the control distinguishable from other desk buttons so switching does not become an accidental interruption.
Measure the device with its largest plugs installed. A short rigid HDMI connector or adapter can extend far beyond the enclosure. Allow finger space to remove the plug correctly, and check that the selector does not collide with a monitor base. Cable visibility is less important than avoiding leverage on the ports.
If the desk changes height or a laptop moves between open and closed positions, check both states. Give cables enough room for documented movement without leaving a snag loop in the chair path. A connection diagram should show the real placement, not just the shortest possible straight lines between devices.
Worked example: two laptops and two displays
Consider a hypothetical consultant using a managed work laptop and a personal laptop. Both need two independent external displays, but only the personal computer may install additional software. The consultant initially selects a dual-monitor KVM based on its output sockets and price.
The cable drawing exposes the missing information. The work laptop’s proposed dock must produce two supported independent feeds without an unapproved driver. The personal laptop’s external-display limit must also support the arrangement. The consultant requests written confirmation for each host-to-dock path before choosing KVM cables.
The next drawing marks a USB upstream connection from each laptop and a separate supported power arrangement. The shared keyboard and mouse are connected to the documented console ports. The meeting headset stays dedicated to the work computer because switching audio in the middle of client calls would be disruptive. A portable SSD also stays outside the switched group to avoid accidental interruption during transfers.
Finally, the consultant counts cable ends at the switch rather than just cables leaving the laptops. The selected placement needs room for several plugs and an accessible remote button. A smaller box with side-facing ports turns out to occupy more practical width than expected. The chosen arrangement is based on the complete working footprint, not the enclosure’s advertised width. This example illustrates planning; it is not a tested recommendation for unnamed hardware.
Add devices in a controlled order
Set up one host, one monitor, and the basic input devices according to the KVM instructions. Confirm the required mode before adding the second host or additional peripherals. Keep a direct monitor connection available for comparison if possible. This establishes a simple supported baseline.
Then test the second host independently, followed by normal switching. Check whether the selected laptop receives keyboard input, whether the mouse behaves as expected, and whether the monitor returns to the required input and mode. Only then add optional devices such as a camera or audio interface to ports documented for those devices.
Avoid switching storage while it is active. Follow its eject and disconnection procedures, and consider leaving it dedicated to one host. If a device needs to remain continuously available, sharing it through a selector may be the wrong design. Convenience should not remove the user action required to disconnect it appropriately.
A cable bill that prevents repeat orders
Host identity and output
Create one row per laptop, including the full model, OS, actual ports used, and required display arrangement. Attach the relevant documentation rather than just a shopping-site screenshot. If the laptops differ, preserve both rows even when they use identical-looking cables. A single successful connection does not verify the other machine’s host path.
Video feeds per host
Count the input feeds the selected KVM requires from each computer. Record connector type at both ends and any supported converter. If the plan has two displays but only one documented video feed where two are required, stop before ordering. Resolve the architecture rather than trying to repair it with an extra splitter after delivery.
Upstream and peripheral USB
Mark which ports connect computers and which accept shared devices. List the keyboard and mouse separately from higher-demand peripherals. A dedicated keyboard emulation port may have different supported functions from a general USB sharing port. Check any unusual keyboard features, wireless receivers, camera, or audio interface against the manual instead of assuming universal support.
Power and adapters
Record every power supply, its destination, and whether it is included. Include the laptop chargers if the KVM does not replace them. Note which cables are bundled so the order does not duplicate them or omit an essential host lead. Keep the power plan independent from the video list to make missing requirements obvious.
Placement and service access
Sketch the box with plugs attached, the selector location, and the route to both laptops. Check whether you can unplug a host without pulling on the other host’s leads. Leave product labels and ventilation features unobstructed. If an under-desk mount is proposed, use only a compatible supported method and preserve the clearance needed by knees and chair arms.
Switching acceptance
Test the real transition: finish a harmless task on host A, switch to B, verify the display and input selection, then return. Include sleep-and-wake behavior if supported and part of daily use. Record any window rearrangement or peripheral reconnection that matters. A model can be compatible yet too cumbersome for your routine; the acceptance decision should reflect both facts.
Keep a connection inventory by cable end
For each lead, write both destinations and its role. Host A video one, host A USB upstream, and monitor one output are clearer labels than HDMI cable or black cable. If the KVM uses a combined supported host cable, record the combined functions instead of inventing separate requirements that do not apply to that model.
Count the cable ends that converge at the switch. This predicts practical crowding better than the number of devices on the desk. Include adapter bodies and retaining screws where relevant, plus the space needed to grasp a plug. A narrow box can require a wide service zone if its connections face sideways.
Label destinations without covering warnings or product identifiers. Keep labels away from connector contacts and moving parts. A private diagram can carry more detail than the physical cable tags. If the setup is shared, use names that both users understand so a cable removed for cleaning can return to the correct host path without trial and error.
A second scenario: the KVM switched more than the user wanted
Imagine a hypothetical developer who uses a work laptop for a meeting and a personal laptop for reference material. The developer wants to move keyboard control briefly while keeping the work call active. The initial plan connects camera, microphone, and input devices to a KVM so everything changes with one press.
The workflow drawing reveals a conflict. Switching the shared USB group would remove the meeting devices from the work laptop. The developer revises the ownership plan before choosing a product. The keyboard and mouse can move, while the work audio and camera remain on a supported dedicated path. Monitor behavior is considered separately: the developer may need one display to remain on the work host while another changes.
That requirement may call for a different supported switching architecture or a simpler combination of manual monitor inputs and USB selection. The developer does not assume every KVM can switch displays independently. Each desired transition is written explicitly and compared with the model’s documented controls.
The resulting cable bill is less symmetrical than the first drawing, but it matches the real task. Dedicated meeting devices are not counted as a failure to share equipment. Their continuity is the reason they remain outside the switched group. If the developer later wants all displays and devices to move together, that becomes a separate use case to verify.
In this hypothetical example, the decisive question is what must stay connected during a transition. The product is selected after that question is answered. No switch is assumed to provide independent routing, continuous camera access, or a particular display-identification behavior without documentation.
Distinguish a convenient switch from a suitable one
A remote button, hotkey, or front-panel selector can make a compatible arrangement easier to use. It cannot correct missing host outputs or an unsupported monitor mode. Rank control convenience after the essential video and USB paths are established, then check whether the control remains reachable in the planned placement.
Similarly, a KVM with extra peripheral ports may add little value if those devices need continuous host ownership. Leave ports unused when sharing them would complicate the routine. The purchasing benefit should be described as a specific supported transition, such as moving two displays and basic input devices between two verified hosts, rather than an assumption that all desk technology will become interchangeable.
Retain the final diagram when ordering. Compare the delivered product and bundled leads with that diagram before installation. If a revision changes the port layout or included cable set, resolve the difference while the setup is still easy to inspect. A clear inventory reduces repeat orders and prevents a missing lead from being mistaken for a more complicated compatibility fault.
Sources and scope
- StarTech dual-display KVM manual - Model-specific example of separate host video and USB paths, console ports and setup order; not a universal product specification.
- StarTech USB sharing product - A USB-only sharing example, used to distinguish peripheral selection from a complete video-switching plan.
- Plugable MST compatibility - Host-to-dock display requirements remain upstream of any KVM.
Editorial note: This is a research-based planning guide, not a hands-on product review. All worked scenarios are hypothetical. Measurements and compatibility must be confirmed for the exact equipment. Photography supplies context, not proof of a tested arrangement.
Photos are illustrative and come from free-license libraries such as Unsplash; diagrams are original to DeskFinds.